How to configure an Amazon Network Load Balancer (NLB) with the PCoIP Connection Manager and Security Gateway or HP Anyware Connector
The following article provides an example on how to setup an Amazon Network Load Balancer with the PCoIP Connection Manager and Security Gateway (CM/SG) or HP Anyware Connector (CAC).
Prerequisites:
Connection Manager & Security Gateway:
1. Deploy the PCoIP CM/SG. See Installing PCoIP Connection Manager and PCoIP Security Gateway
2. Configure the PCoIP CM/SG. See: Connection Manager and Security Gateway Configuration Guide
-
In ConnectionManager.conf file:
-
Set SecurityGatewayEnabled = true
-
Add a new line, ExcludeCookies = AWSELB, AWSALB, AWSALBCORS
-
-
In SecurityGateway.conf file:
-
Set ExternalRoutableIP = <EC2 instance Public IP>
-
3. Restart the CM/SG services. See: Administering the PCoIP Connection Manager and PCoIP Security Gateway
HP Anyware Connector:
1. Deploy a HP Anyware Connector. See: Installing the HP Anyware Connector
2. Configure the HP Anyware Connector, set the external-pcoip-ip flag to the EC2 instance Public IP. See HP Anyware Connector flags
Notes:
-
You can deploy as many PCoIP CM/SGs or HP Anyware Connector you need behind an NLB.
-
The Load Balancer and the CM/SG or HP Anyware Connector can be deployed in different subnets but they have to be within the same VPC.
-
To improve failover recovery, Its recommended to deploy multiple CM/SGs or HP Anyware Connector inside different AWS Availability Zones.
-
Teradici CM/SG and HP Anyware Connector currently supports load balancing HTTPS traffic.
-
Target CM/SG or HP Anyware Connector instances must have a Public IP.
Diagram:
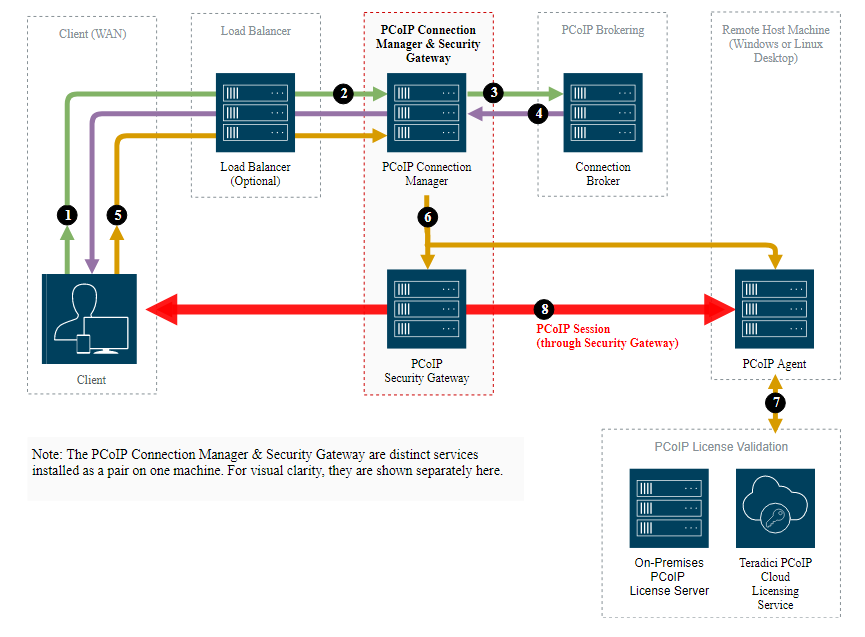

Setting up an Network Load Balancer with the PCoIP Connection Manager and Security Gateway or HP Anyware Connector.
1. Log into the AWS Console.
2. Go to Compute > EC2 > LOAD BALANCING > Load Balancer and click the Create Load Balancer button.
3. Select Network Load Balancer.
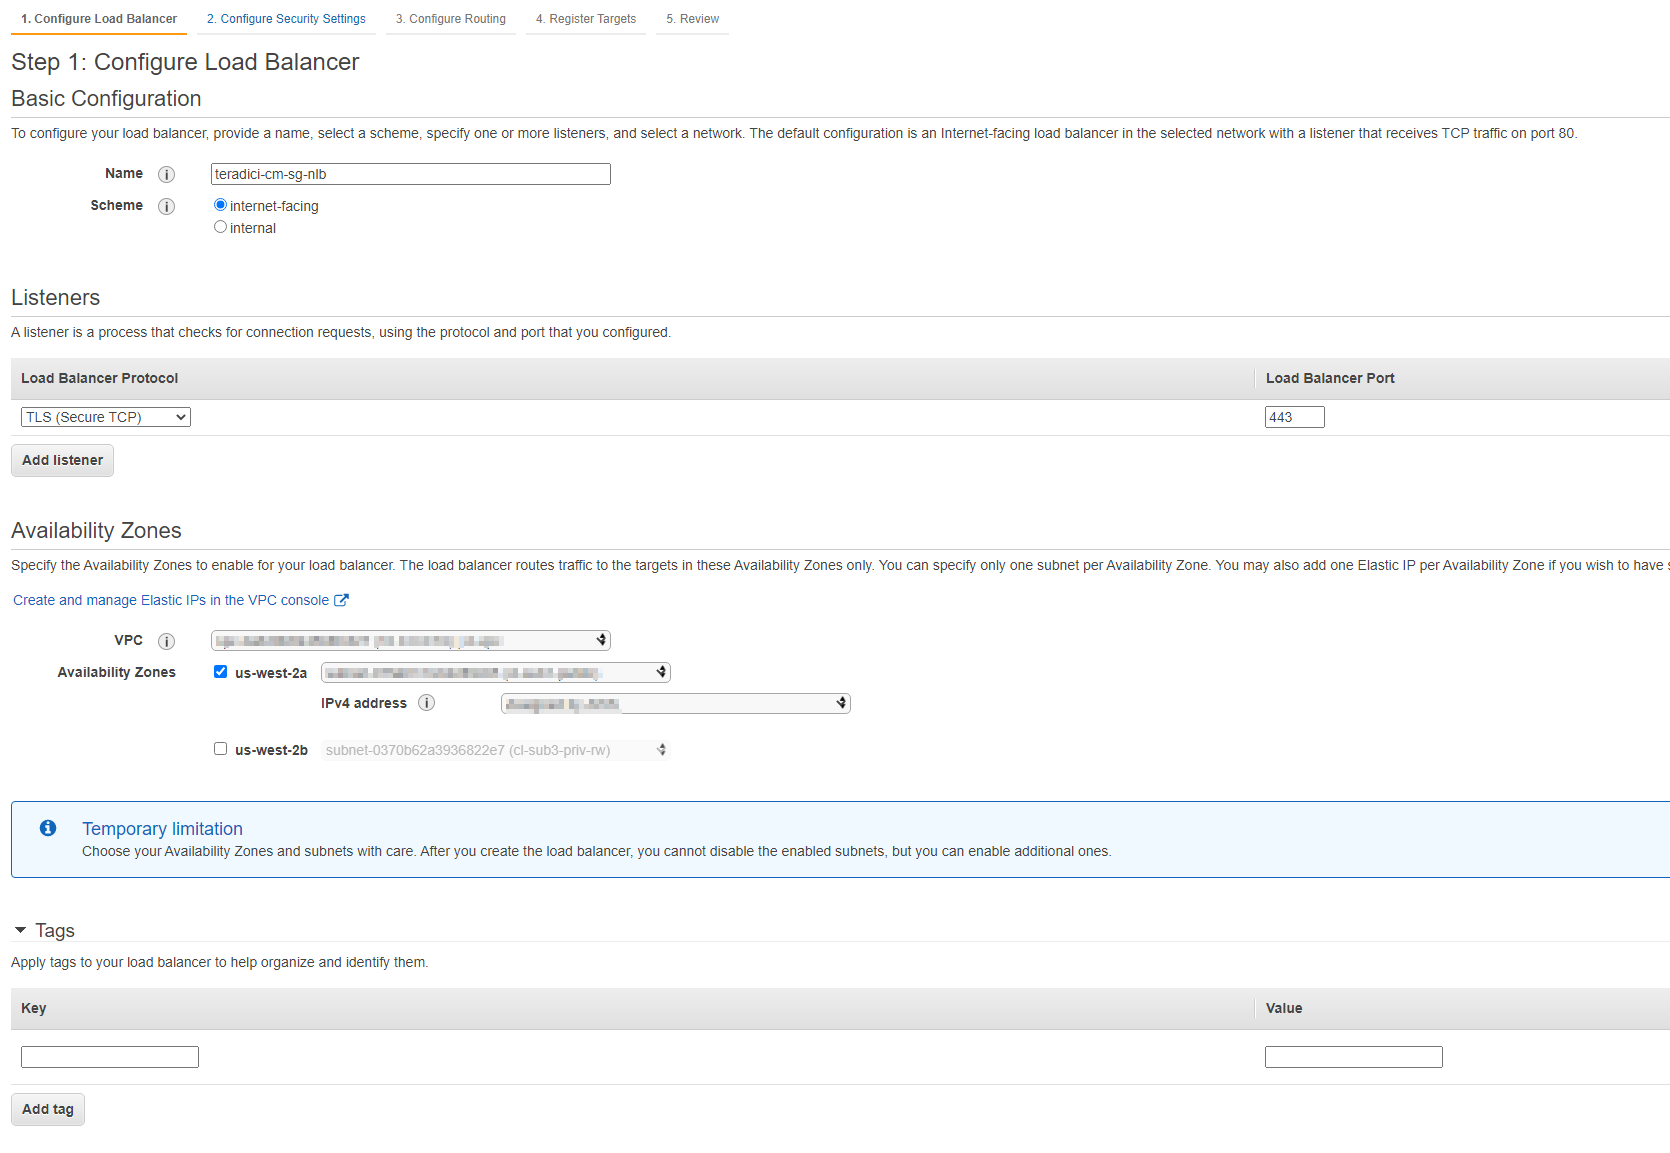
4. Configure your Load Balancer.
2. Go to Compute > EC2 > LOAD BALANCING > Load Balancer and click the Create Load Balancer button.
3. Select Network Load Balancer.
4. Configure your Load Balancer.
a. Basic Configuration:
-
Name: The name of your Load Balancer.
-
Scheme: Internet-facing
b. Listeners:
-
Load Balancer Protocol: TLS (Secure TCP)
-
Load Balancer Port: 443
c. Availability Zone:
-
VPC: Select your preferred VPC
-
Availability Zone: Select the availability zones that the EC2 instances reside.

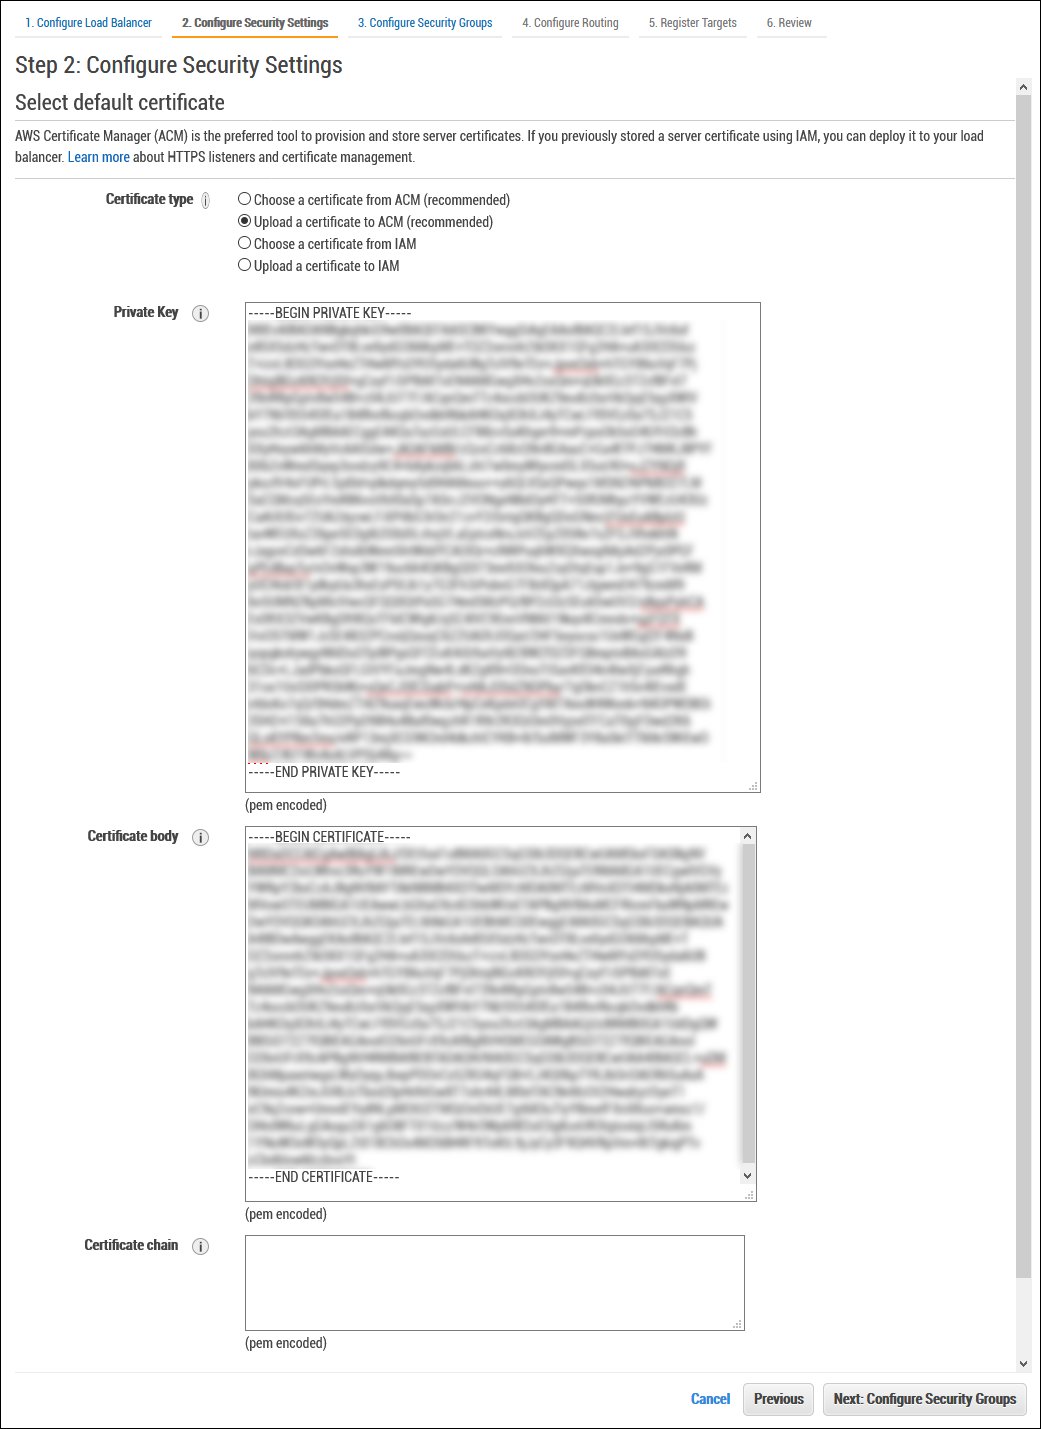
5. Configure Security Settings
a. Select default certificate
-
Certificate type: Choose or upload your certificate from/to Amazon Certificate Manager (ACM) or Identify and Access Management (IAM)
-
Certificate must be in PEM format.
-
Note: For publicly signed certificates, or internal certificates created using an internal CA, you must include the certificate chain. For self-signed certificates you will not require a certificate chain entry.
For more info on certificates and listeners refer to AWS Doc:
b. Select Security policy
-
Security policy: Select your security policy which is SSL.
Example of uploading a self-signed certificate in PEM format.

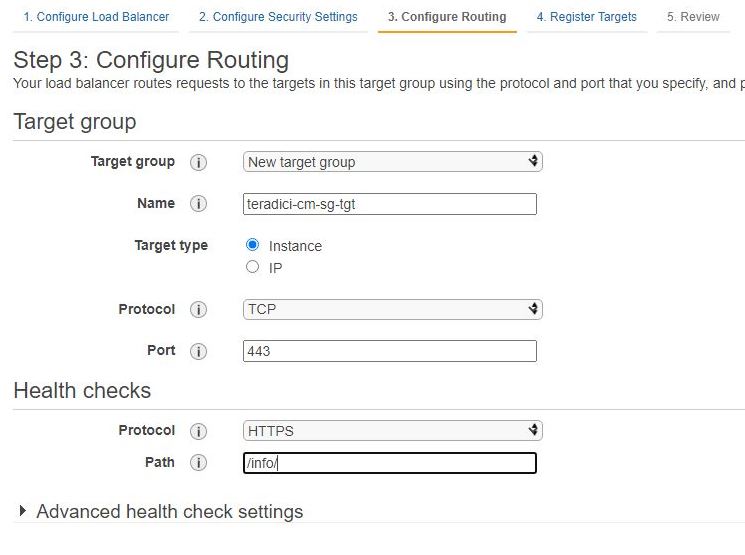
6. Configure Routing
a. Target Group:
-
Target Group: New Target
-
Name: Name of your Target Group
-
Target type: Instance
-
Protocol: TCP
-
Port: 443
b. Health Checks:
-
Protocol: HTTPS
-
Path: /pcoip-broker/xml
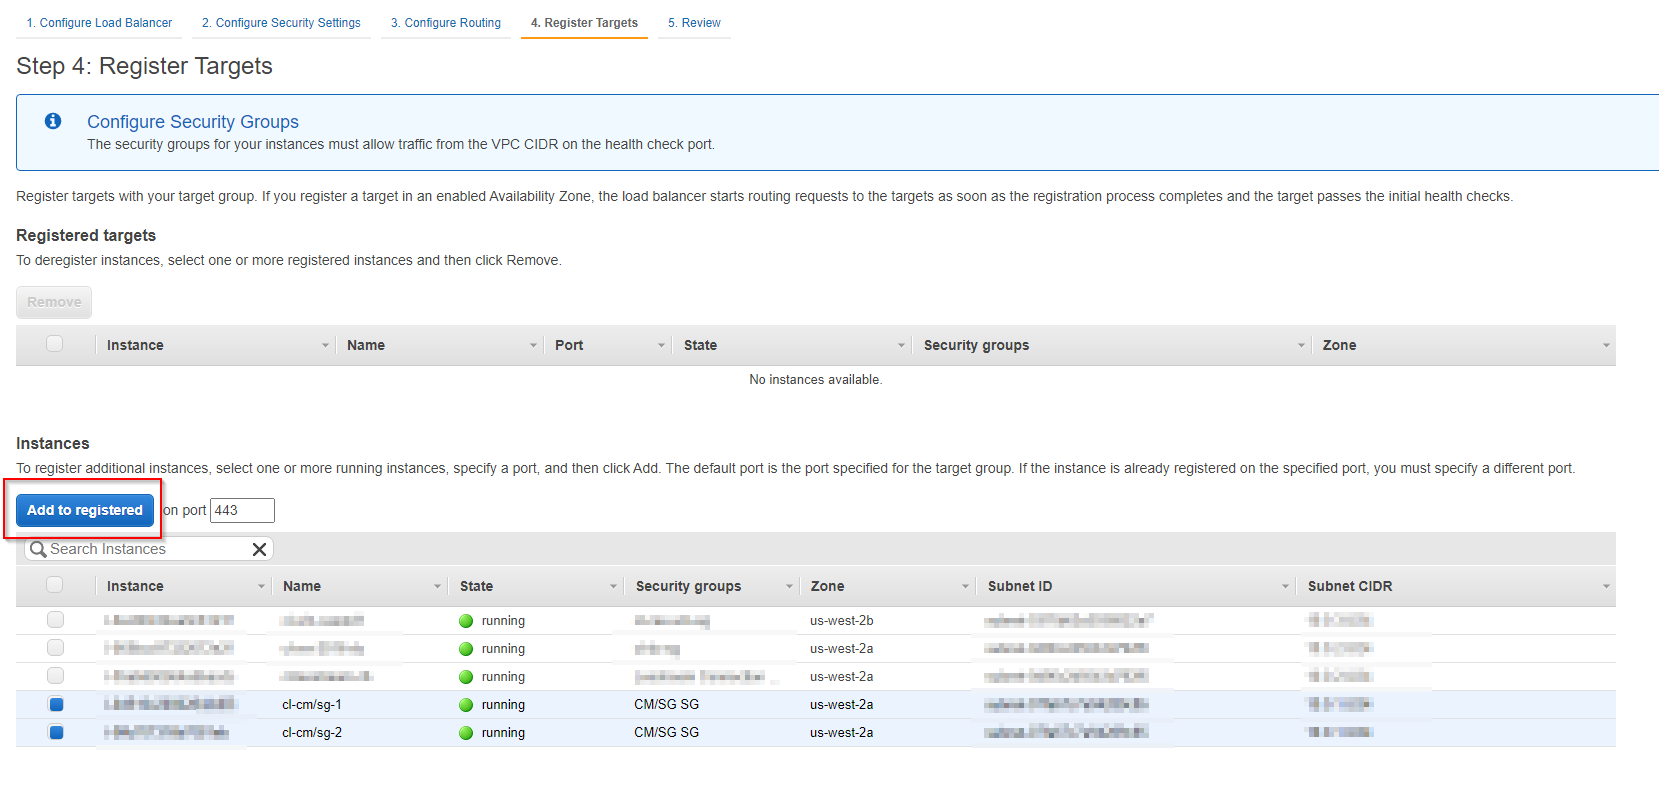
7. Register Targets
a. Register your target groups by selecting the EC2 instances running the PCoIP CM/SG or CACs and clicking the Add to registered button.

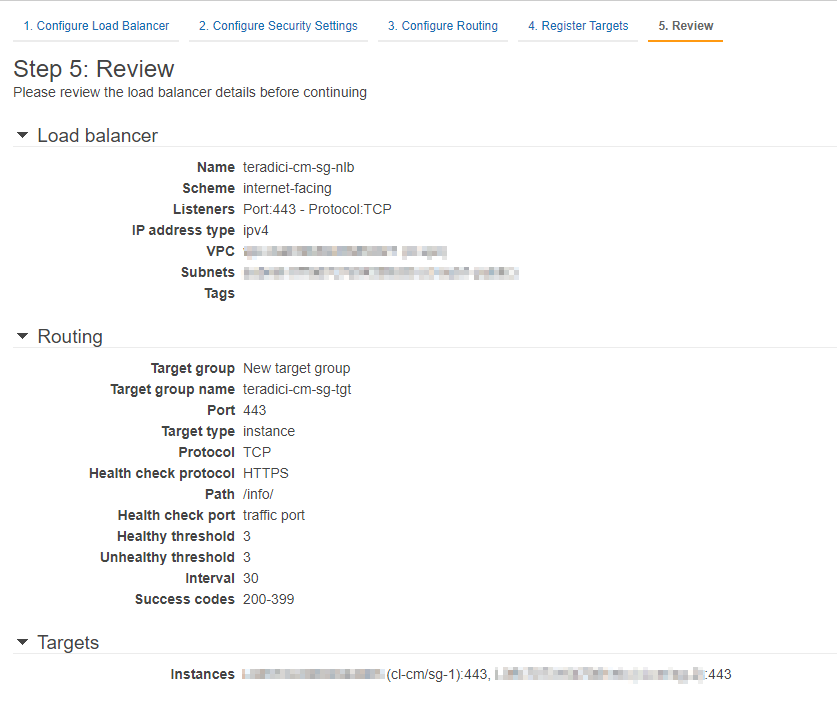
8. Review:
a. Review your configuration and select Create.
9. From a PCoIP Client, enter the Load Balancer's DNS name or IP Address to establish a PCoIP Connection.