What are the best scenarios and setups HP Anyware uses to test its implementation of SCEP?
These are the setups and scenarios used to test HP Anyware implementation of SCEP (Simple Certificate Enrollment Protocol).
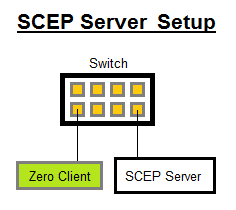
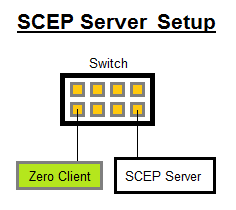
Tested SCEP Server Setups:
|
OS: |
Windows Server 2008 R2 |
|
Installed Role Services: |
Active Directory Certificate Service Network Device Enrollment Service |
|
Configurations Tested:
|
Enterprise Root CA Enterprise Sub CA Standalone Root CA Standalone Sub CA |
|
SCEP Hash Algorithms Tested: |
SHA1 SHA2 MD5 |
|
OS: |
Windows Server 2003 |
|
Installed Role Services: |
Active Directory Certificate Service Network Device Enrollment Service |
|
Configurations Tested: |
Enterprise Sub CA |
|
SCEP Hash Algorithms Tested: |
SHA1 |
|
OS: |
Windows Server 2012 |
|
Installed Role Services: |
Active Directory Certificate Service Network Device Enrollment Service |
|
Configurations Tested: |
Standalone Root CA |
|
SCEP Hash Algorithms Tested: |
SHA1 |
Scenarios Tested:
- One-time passwords enabled
- One-time passwords disabled \u2013 shared password for all SCEP clients (to simplify large-scale deployment)
- Configure 802.1X with SCEP-retrieved certificates
Testing SCEP:
- Ensure UseSinglePassword registry value is correctly set on the Windows SCEP Server;
- Enabled: [HKEY_LOCAL_MACHINE\SOFTWARE\Microsoft\Cryptography\MSCEP\UseSinglePassword]
"UseSinglePassword"=dword:00000001; - Disabled: [HKEY_LOCAL_MACHINE\SOFTWARE\Microsoft\Cryptography\MSCEP\UseSinglePassword]
"UseSinglePassword"=dword:00000000;
- Enabled: [HKEY_LOCAL_MACHINE\SOFTWARE\Microsoft\Cryptography\MSCEP\UseSinglePassword]
- Retrieve SCEP password from Administrator PC that is also on the same SCEP server subnet (by accessing http://<scep-server>/certsrv/mscep_admin/);
- Connect Zero Client to the same subnet as the SCEP server;
- Once IP address is acquired, configure SCEP on the Zero Client through either the web UI or OSD;
- Enter the following information;
- SCEP Server URL (usually http://<scep-server>/certsrv/mscep/mscep.dll);
- Challenge Password;
- Click on \u201CRequest Certificate\u201D. The Zero Client should retrieve both the SCEP Root CA and SCEP Client Certificate.
Note: Subsequent SCEP requests will require a new SCEP password if one-time passwords (UseSinglePassword enabled) are used.
Testing SCEP with 802.1X:

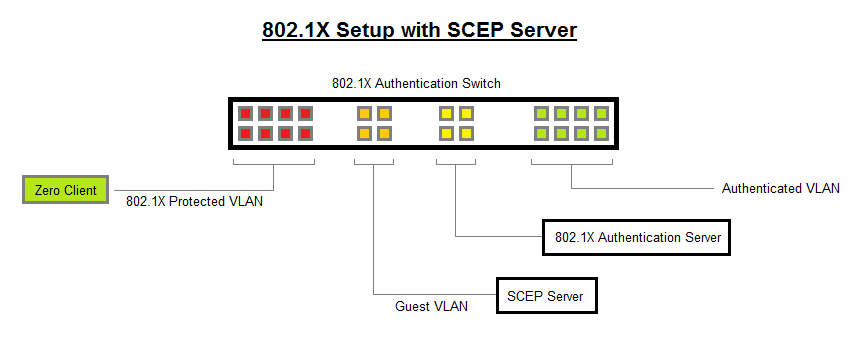
- For the SCEP server to work correctly with the 802.1X EAP-TLS setup, follow the steps below to configure the network:
- Place the SCEP server in the Guest VLAN;
- Whenever new Zero Clients are connected to the 802.1X EAP-TLS protected VLAN, it fails authentication and is put onto the Guest VLAN;
- When on the Guest VLAN, the Zero Clients retrieves the necessary 802.1X certificates with a SCEP request, it is configured with the correct 802.1X settings (identity string and correct client certificate chosen);
- When configuration is complete, restart the Zero Client;
- The Zero Client should now be able to correctly authenticate with the Authentication Switch, and be put onto the Authenticated VLAN;
- Some issues may arise getting the SCEP server to work with 802.1X using the default \u201CIPSEC Offline\u201D Certificate Template. For instance, a 802.1X Server only accepted the SCEP certificates when the SCEP server was configured to use the \u201CUser\u201D Certificate Template.
MC Configuration:
If you are new to the Management Console, consult the MC User Guide (included in the MC package) before proceeding with setup. Chapter 5, Getting Started, shows how to apply settings to devices.
If you are already comfortable with the MC, follow the steps below to set up SCEP:
- Create a new group;
- Click on GROUPS tab to open Group Management webpage;
- Click on Add New button to add a new group;
- Fill in the Name and the Description field and click Save. You can leave the Profile field as it is for now;
- Add devices into a group;
- Click on DEVICES tab to open Device Management webpage;
- Select a device or devices from the device list;
- Select a group from the Destination Group menu in the Grouping section;
- (Optional) Fill in the Device Password field, if the device is password-protected;
- Click Add;
- Create a profile;
- Click on PROFILES tab to open Profile Management webpage;
- Click on Add New button to add a new profile;
- Fill in the Name and the Description field and click Save;
- Configure SCEP setting in a profile;
- Click on PROFILES tab to open Profile Management webpage;
- Click on Set Properties link button from the profile list to open Manage Profiles \u2013 Set Properties webpage;
- Click on SCEP Configuration tab to expand the tab;
- Click on Edit Properties link button to bring up the Set Properties pop-up window;
- Click Set in Profile toggle buttons to enable SCEP Server URI, Challenge Password and Use Certificate for 802.1X fields;
- Fill in the fields;
- Click Save. Once the Set Properties pop-up window is gone, you will see the SCEP settings under the SCEP Configuration tab;
- Apply the profile;
- Click on GROUPS tab to open Group Management webpage;
- Click on Edit link button from the group list to bring up the Edit Group pop-up window;
- Select the profile from the Profile list;
- Click Save;
- Click on Apply Profile link button from the group list to bring up the Apply Profile pop-up window;
- Select the reboot behavior. In order for the SCEP to work right away choose Automatically after applying profile;
- Click OK to start the profile application;
- View the profile application status from the Profile Application Status column. You can also click View Details link button for more detail.