How to create an active directory certificate using Windows
This is an unsupported reference article to help those having difficulties creating their Active Directory Certificates using Windows.
This article is unsupported due to the conflicts that can arise when non-Teradici software and operating systems are updated. These changes may affect the procedure or the order of steps outlined below. In these cases, you will be required to research the components used in your environment and make the necessary changes.
This procedure used the following:
- Windows Server 2016 Amazon WorkSpaces instance (64bit) - computer with OpenSSL for Windows installed on it
- Windows Server 2016 Datacenter Active Directory Server (64bit)
- OpenSSL for Windows (64bit) - Version 1.1.0h
How to create AD certificate on Windows:
- Install OpenSSL for Windows. (64bit in this example)
- Add the Environment Variable system path so you can initiate the openssl command. (not using the OpenSSL command window)
- On the computer that has OpenSSL installed, create a new folder called my-certs. (you can call it anything)
- Change folders to my-certs folder.
- Generate a new key by opening the Administrators: Command Prompt and entering the following command:
openssl genrsa -des3 -out ca.key 4096
Example:
C:\my-certs>openssl genrsa -des3 -out ca.key 4096 - Enter a password when prompted.
- Generate the root CA by opening the Administrators: Command Prompt and entering the following command:
openssl req -new -x509 -days 3650 -key ca.key -out ca.crt - Enter your details when prompted.
- Check you have two files under my-certs folder called ca.crt and ca.key, (if they do not exist, repeat steps 1 to 6)
- Create a folder on your Active Directory Server and copy ca.crt to the folder. (you cacn call it anything)
- On your Active Directory Server, open an mmc with the Certificates (Local Computer) snap-in. You may have to add the snap-in. (see Microsoft documentation for assistance if needed)
- From Trusted Root Certification Authorities import ca.crt, accepting all the defaults as you import the file.
- Create a file in the same folder as the ca.crt file (step 10) on the Active Directory Server and name it request.inf.
TIP: When creating this file, make sure you have not created a .txt file. Do this by first making sure you have the Folder Options set to see all your extensions and hidden files by ensuring the settings under Folder Options > View are configured with:- Show hidden files, folders, and drives as selected
- Hide extensions for known file types as deselected
- Add the following content to the request.inf file being sure to update the Subject with your AD server FQDN
[Version] Signature="$Windows NT$" [NewRequest] Subject = "CN=<ads_fqdn.yourcompany.com>"; maintain the double quotes and replace the triangular brackets with your AD server FQDN KeySpec = 1 KeyLength = 2048; this is required to work with MC Exportable = TRUE MachineKeySet = TRUE SMIME = FALSE PrivateKeyArchive = FALSE UserProtected = FALSE UseExistingKeySet = FALSE ProviderName = "Microsoft RSA SChannel Cryptographic Provider" ProviderType = 12 RequestType = PKCS10 KeyUsage = 0xa0 [EnhancedKeyUsageExtension] OID = 1.3.6.1.5.5.7.3.1 - From an Administrators: Command Prompt on your Active Directory Server, browse to where you saved request.inf and run the following command:
certreq -new request.inf client.csr - Copy the newly created client.csr file from the previous step to the my-certs folder on the computer with OpenSSL installed on it.
- On the computer with OpenSSL installed, browse to the my-certs folder and create a new text file called v3ext.txt.
- Edit v3ext.txt by adding and saving the following content:
keyUsage=digitalSignature,keyEncipherment extendedKeyUsage=serverAuth subjectKeyIdentifier=hash - To create the AD certificate, under the my-certs folder run the following command:
openssl x509 -req -days 3650 -in client.csr -CA ca.crt -CAkey ca.key -extfile v3ext.txt -set_serial 01 -out client.crt - Enter the password from step 6 when prompted to.
- A new file client.crt is created.
- View the client.crt file by running the following command:
Confirm the following lines are present:openssl x509 -in client.crt -textX509v3 Key Usage: Digital Signature, Key Encipherment X509v3 Extended Key Usage: TLS Web Server Authentication X509v3 Subject Key Identifier - Copy client.crt to the folder created in step 10 on your Active Directory Server.
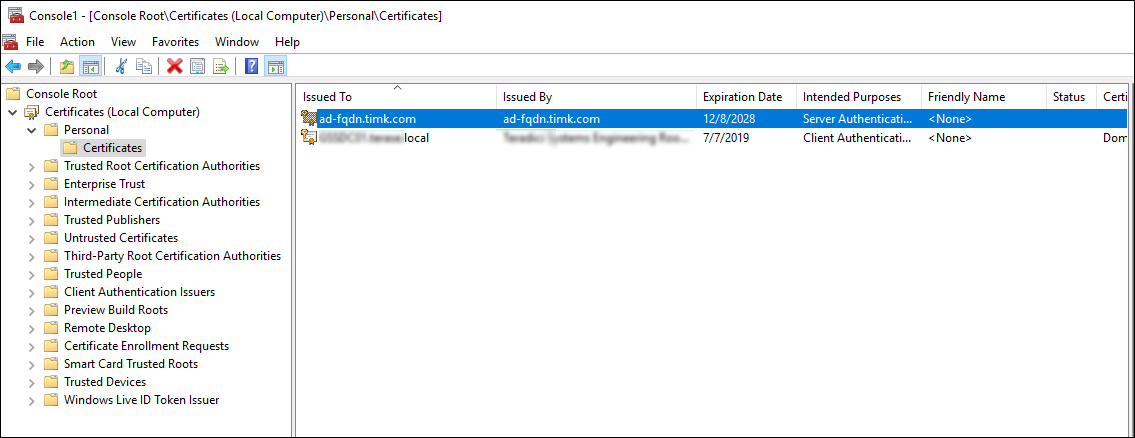
- Open an mmc with the Certificates (Local Computer) on your Active Directory Server.
- From Personal > Certificates, import client.crt, accepting all the defaults while you import the file.
- You should see a new certificate added with your AD Server FQDN. (if you don't see that you made mistakes in one of the steps—try again)
- Restart your AD Server.
(Example: You can use Start > Server Manager > AD DS > SERVICES right click Active Directory Domain Services and click Restart Services. - On a different computer other than your AD Server, install/import the ca.crt file and run the following command to test if LDAPS is working:
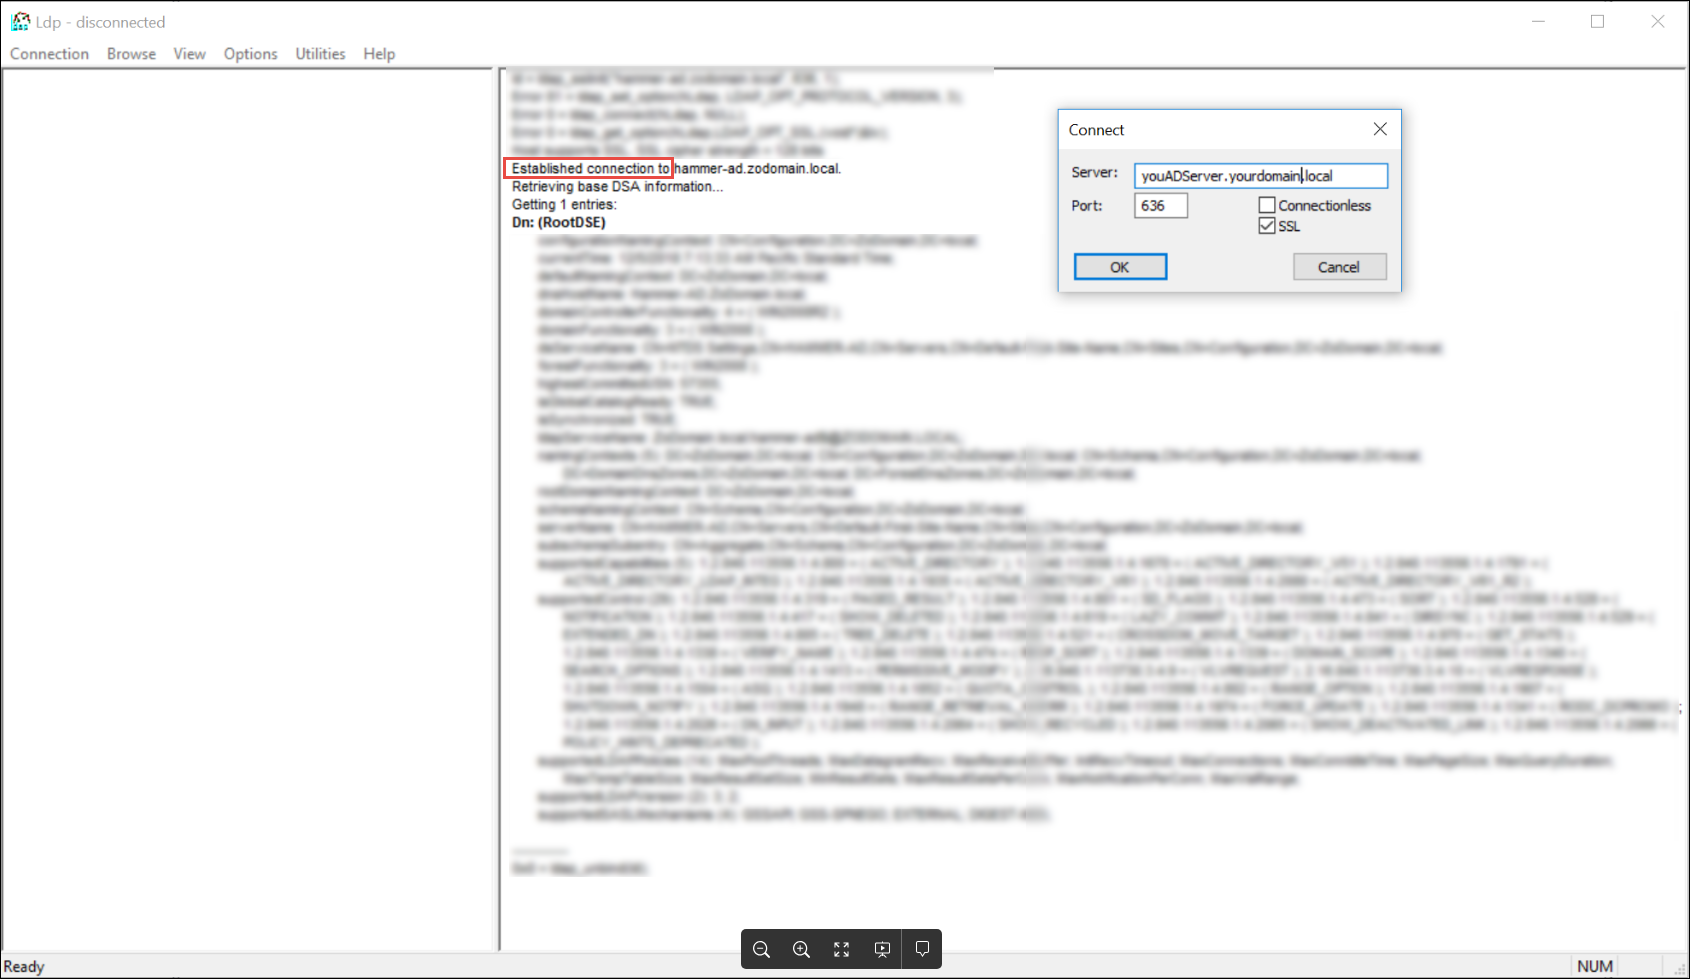
ldp.exe
Check that your LDAPS connection is working as expected by connecting to the AD Server using ldp.exe found in the C:\Windows\System32 folder on the computer with OpenSSL installed on it. From the Ldp window select Connection > Connect... and enter the port number of 636, your AD server FQDN and select SSL. The window will populate with information identifying whether your connection was established or not.