How do I enable NTP on PCoIP Zero Clients and PCoIP Remote Workstation Cards?
Enabling NTP is important on the PCoIP Zero Client and PCoIP Remote Workstation Card. NTP is using for the following:
- Setting the time and date of the PCoIP Zero Client and PCoIP Remote Workstation Card. As there is no battery on the devices, the time and date is lost on a power cycle.
- Validating the Valid From and Valid To dates of certificates
- Enabling the time and date for the event logs
There are two ways to enable NTP: from the administrative web interface or from the PCoIP Management Console.
To enable NTP from the web interface:
- Go to the IP address of the zero client (or host card) from a browser.
- Log in, and then from the Configuration menu, choose Time.
- Select the Enable NTP box
- Select Identify NTP Host by: selecting the IP Address or FQDN radial buttons
- For IP Address - enter the NTP Host IP Address
- For FQDN - enter the NTP Host fully qualified domain name
- Optionally set the NTP Host Port (default is UDP port 123)
- Optionally set the NTP Query Interval (number of minutes, hours, days or weeks)
- Optionally set the Time Zone offset for the client location
- Optionally set the Enable Daylight Saving Time to automatically adjust for daylight
- Click Apply
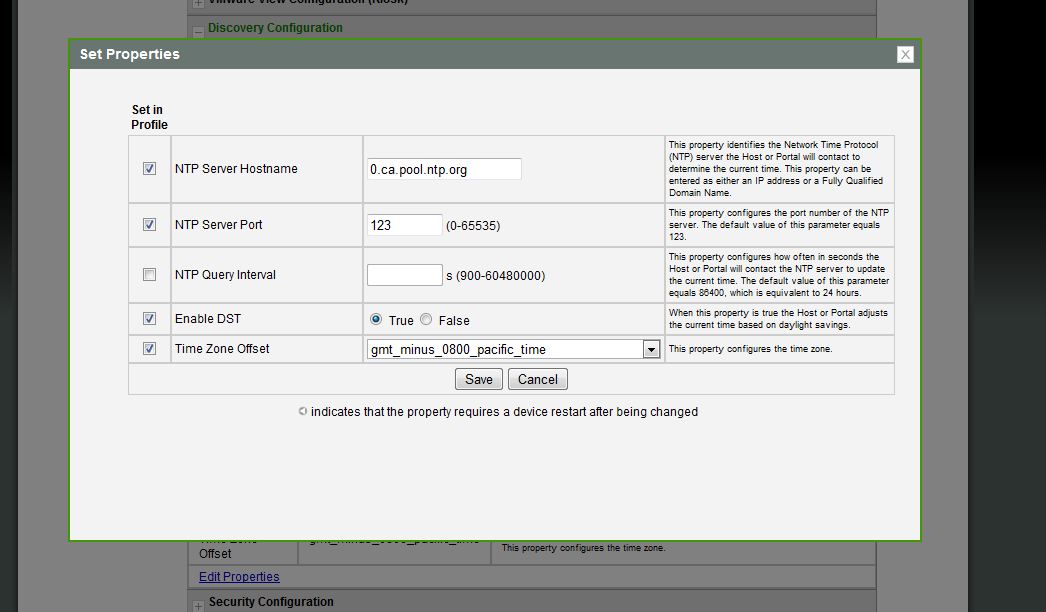
To enable NTP from the Management Console 1:
- Go to the PCoIP Management Console IP address from a browser.
- Log in, and select the Profile tab.
- For an existing Profile, or after creating a new profile, select Set Properties
- Select Time Configuration
- Select Edit Properties and for each of the parameters entered select Set in Profile button
- Enter the NTP Server Hostname IP address or FQDN
- Optionally enter the NTP Server Port (default is UDP port 123)
- Optionally enter the NTP Query Interval in seconds (default is 24 hours, or 86,400 seconds)
- Optionally set the Enable DST preference to automatically adjust for daylight savings time.
- Optionally set the Time Zone Offset for the client location.
- Click Save.
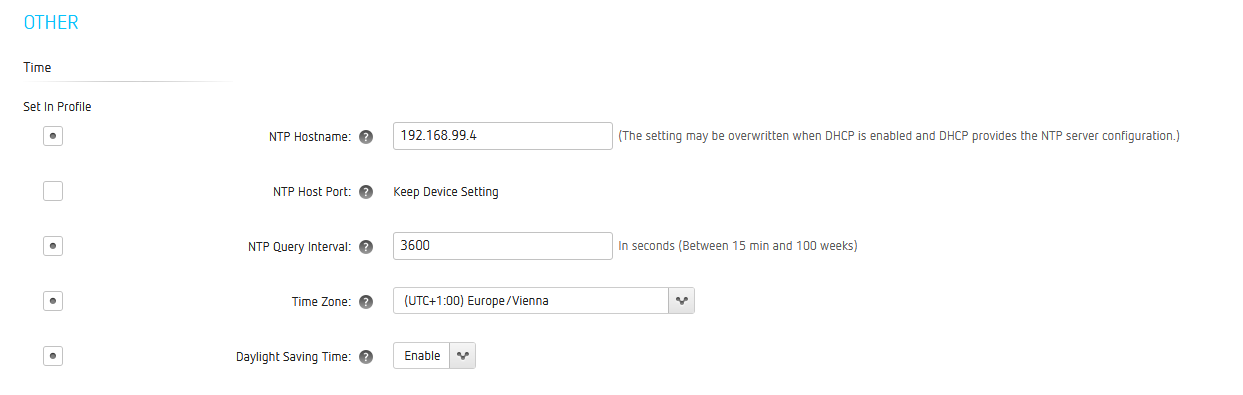
To enable NTP from Management console 2 & 3:
- Go to the PCoIP Management Console IP address from a browser.
- Log in, and select the Profile page.
- For an existing Profile, or after creating a new profile, select Edit.
- Go to time settings in Other section.
- Enter the NTP Server Hostname IP address or FQDN.
- Ennter the NTP Server Port (default is UDP port 123)
- Enter the NTP Query Interval in seconds (default is 24 hours, or 86,400 seconds)
- Optionally set the Enable DST preference to automatically adjust for daylight savings time.
- Optionally set the Time Zone Offset for the client location.
- Click Save.