Core API - PCoIP Client SDK for Windows
Core API Change Log
This section outlines API call updates and changes for the Core API from the different versions of the PCoIP Client SDK for Windows.
20.10
PcoipClientInitData
-
PcoipClientInitData structure has been changed for licensing related data. The following fields have been added:
- proxyServer
- proxyPort
- numberOfActivationCodes
- activationCodes
pcoip_core_api.h
- pcoip_core_api.h structure change: struct LicenseInfo has changed to the following:
struct LicenseInfo
{
    enum PCoIPLicensingResult resultCode;   ///< the result code as reported by the licensing module
    bool hasExpiry;  ///< license has a valid expiry time
    time_t expiryTime;  ///< time that license expires expressed as UNIX time
};
The change to this struct affects the pcoip_client_get_licensing_info() API function. Replaced the int32_t daysRemaining with time_t expiryTime and added field bool hasExpiry.
- New api: pcoip_client_log_level_get(). Returns the current event level defines as PCOIP_EVENT_LEVEL_* constants.
20.07
pcoip_core_api.h
- PcoipClientinitData structure change: trustCenterUrl renamed to licServerURL.
- New api: pcoip_core_aws_allowed(). Returns whether connections to Amazon WorkSpaces are allowed.
- New api: pcoip_core_api_vmware_allowed(). Returns whether connections to VMware Horizon are allowed.
- New api: pcoip_core_api_pcoip_allowed(). Returns whether PCoIP connections are allowed.
20.04
pcoip_core_api.h
-
pcoip_client_init() signature change: Uses new PcoipClientInitData structure. It includes data needed for licensing in future releases. The new data members should be left empty. Unused parameters were removed.
-
Deprecated api: pcoip_client_connection_callback_register()
- New api: pcoip_client_connection_callback_register(). Callback signature changed to include PCoIPAuth state for licensing in future releases.
- New api: pcoip_client_usb_set_local_termination_blacklist(). Sets devices that should be locally terminated.
pcoip_disconnect_types.h
- Added value to enum ePCOIP_DISCONNECT_CAUSE. Will be used for licensing in future releases.
certificate_store.h
- certificate_store set_store_location() removed. Location can now only be set during construction of certificate_store.
20.01
- No updates or changes.
19.11
- Relative Mouse Feature
19.08
- No updates or changes.
PCoIP Core Library Integration
The core library allows an application developer to integrate a PCoIP session directly into an application. The core library facilitates connection to a remote host, decoding PCoIP image data directly into an application supplied frame buffer as well as remoting audio, keyboard and mouse events and supported USB devices. The application is responsible for all of the interactions with the window manager and the local operating system. The following diagram shows how an application would integrate the core library and broker library into a custom application.
Core API
This method uses the Core API to integrate the PCoIP protocol into a custom application. This method is necessary if you want custom features in the client beyond that which is possible using the Session Client API.
Core API
This diagram shows the architecture with a custom application integrating the core library.

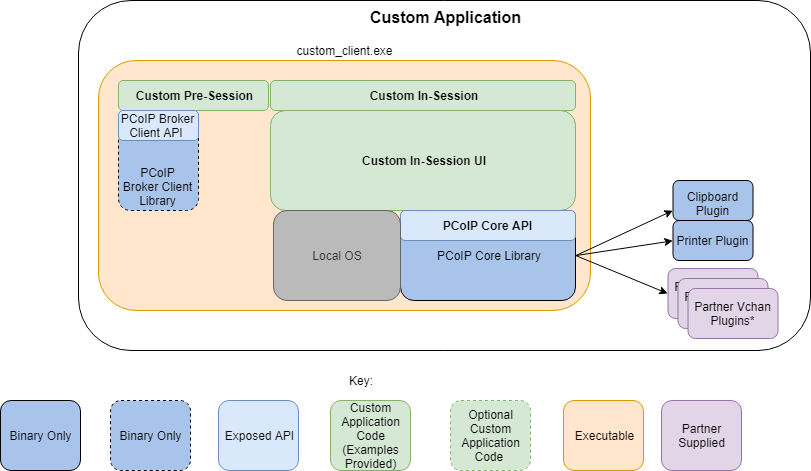
*Partner Virtual Channel Plugins can be developed using the Virtual Channel SDK, to enable this you can combine the PCoIP Client SDK with the PCoIP Virtual Channel SDK.
Core API and Application Functionality
Using the Core API the application developer has more control over the client application than the Session Client API but the developer must implement the integration between the local OS and the core library.
Broker Interactions
The core library does not implement any of the broker protocol interactions. The application is responsible for obtaining the PCoIP agent address, port number and session tag, using the Broker Client API or some other brokering method, and passing these to the core library.
Session Establishment
The application must provide the PCoIP Agent address, port number and session tag to the core library in order to establish a PCoIP session.
Display Topology
The application is responsible for deciding what displays to present to the user. The application may specify up to four displays with resolutions up to 4096x4096. The application must determine the correct display position and the rotations (if any).
Keyboard Events
The application is responsible for handling local keyboard events, and providing the core library with scan codes to send to the remote host.
Mouse Events
The application must provide the mouse events, with either absolute or relative coordinates, for the core library to send to the remote host.
Touch Events
If the application supports touch events, the core library can forward these to the remote host.
Cursor Handling
Local cursor handling is critical for providing the most responsive user experience possible. The application is responsible for updating the local cursor shape and position on call-back from the core library.
USB Redirection
The application is responsible for determining if any USB devices should be connected to the remote session. The core library will disconnect the USB devices from the local system and redirect the device to the remote system.
Session Reconnection
The core library supports reconnecting a session (for up to 20 minutes) in the event of a network disruption. The application is notified when a network disruption occurs and provides a method for terminating reconnection attempts.
Session Termination
The core library provides a method for the application to terminate the session.
Setting Up the Development Environment
Once you have successfully established a session between a PCoIP Software Client and a PCoIP host, you can start developing your own PCoIP client. To begin, set up your client development environment, as discussed next.
To set up your client development environment:
-
Install Boost version and OpenSSL on the system. The CMake modules provided with the SDK will automatically find them at CMake configure time once they are installed. Library names and specific versions are encoded in the path names within the third-party tree.session_client_third_party*.tar.gz only contains the version of OpenSSL available at the time of distribution. You need to obtain and update any future security updates that may be issued.
- Unzip the SDK tar file.
- Copy the files to the desired directory where you are developing the custom application. For information on building the SDK.
If you will be incorporating USB devices into your Windows client application, you must also install the Client USB package.
Windows Prerequisites
The following must be installed to build the PCoIP Client SDK on Windows:
-
Boost v1.71 and OpenSSL 1.1.1
-
MS Visual Studio 2015 with Update 3 https://www.visualstudio.com/downloads/
-
CMake 3.13 or above https://cmake.org/download/ Make sure CMake is in the system PATH; CMake does not automatically add itself to the system PATH during installation. The PCoIP Client SDK does not support versions of CMake lower than 3.13.
Configuring CMake for PDB Files
In addition to the full .pdb files, a project can be configured to generate stripped .pdb files by adding the /PDBSTRIPPED:filename linker switch. For example, in CMake:
* set_target_properties( pcoip_client PROPERTIES LINK_FLAGS "/DEBUG
/PDBSTRIPPED:pcoip_client.pdb" )
All full .pdb files are copied over automatically to CMAKE_PDB_OUTPUT_DIRECTORY if CMAKE_PDB_OUTPUT_DIRECTORY is defined in the cmake file. Stripped .pdb files are generated at the location where the .vcxproj file is located.
For more information on debugging with symbols, see https://msdn.microsoft.com/en-us/library/windows/desktop/ee416588(v=vs.85).aspx
Windows Build Procedure
Boost and Qt are external dependencies that the SDK expects to be installed on the system on which the example code is being built.
- The SDK package has 5 directories. The headers are inside include/, libraries are inside lib/ and bin/ and the cmake modules required for finding and importing dependencies are inside cmake/.
- In order to build the examples provided inside examples/, cd into any of the examples directories.
- Create a folder called build/ and cd into build/.
-
To configure the build system run:
cmake -A x64 path/to/source/code
-
To build the example run:
cmake --build .
-
Now the build/ directory should have the built examples as a .exe which you can launch from the command line or double click depending on what you have built.
-
Ensure the CMakeLists.txt file present inside the directory has the path to the SDK directory appended to CMAKE_PREFIX_PATH so that the installed version of cmake on the system is able to locate the cmake modules for finding the dependencies:
list(APPEND CMAKE_PREFIX_PATH "localpath/to/sdk/")

find_package(PCoIPSoftClientSDK REQUIRED)
-
At this point, you can link your application to the core library using the CMake command:
target_link_libraries(your_application PRIVATE PCoIPSoftClientSDK:pcoip_core)
-
You can link any other required libraries similarly by appending it to the above command.
Setting Up a PCoIP Agent Test Environment
Before developing your custom client, you should set up a working PCoIP system. HP Anyware recommends establishing a small proof-of-concept system for custom client testing, consisting of a host machine with an installed PCoIP Agent.
Before using your test environment, you must install a PCoIP agent development license on the host machine. You received a license when you subscribed to a HP Anyware All Access solution, specifically HP Anyware or HP Anyware Plus. If you do not have a license, obtain one from HP Anyware before proceeding.
To establish a working proof-of-concept test system:
- Establish your host virtual machine and determine the PCoIP Agent that best fits your actual PCoIP environment.
-
Install the PCoIP agent on the host machine. For PCoIP Agent installation instructions, refer to the appropriate administrators' guide:
-
Install your agent license on the host machine. For license installation instructions, see the Administrators' Guide for your host machines PCoIP Agent.
Once your test system is set up, you can establish PCoIP connections to it using HP Anyware PCoIP Software Clients. For environment testing and troubleshooting purposes, the HP Anyware PCoIP Software Client is available here: https://www.teradici.com/web-help/pcoip_client/windows/21.01/support/contacting_support/