Configuring and Installing External MongoDB and Vault using self-signed TLS Certificates
Overview
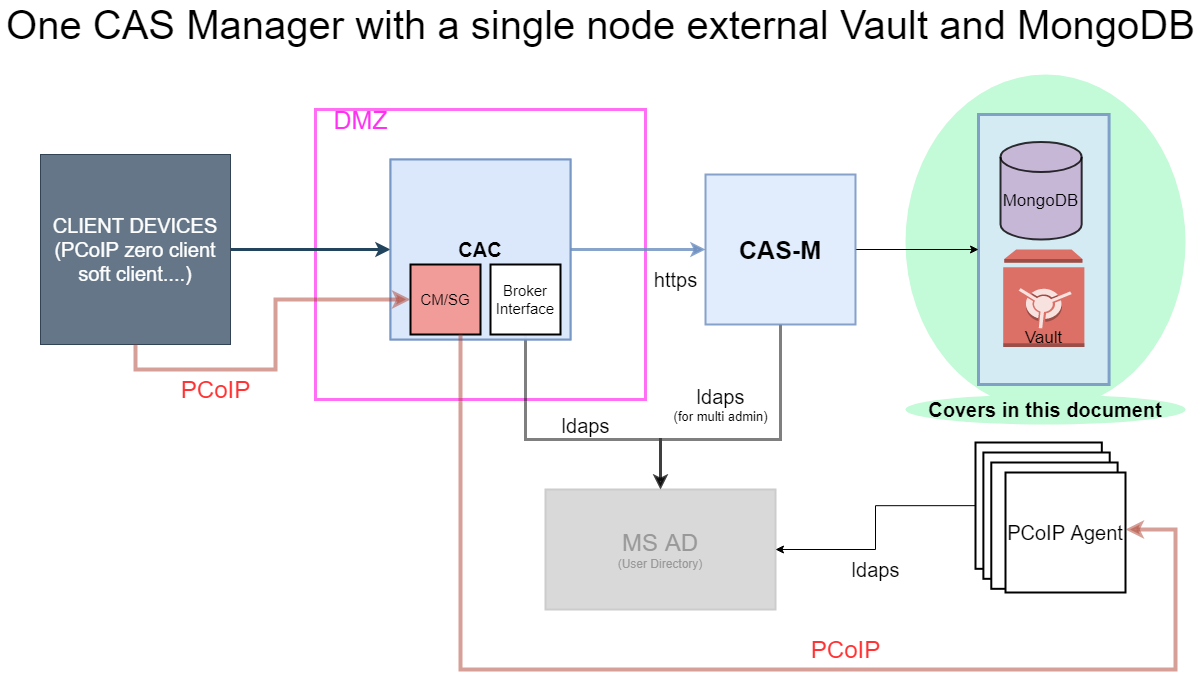
The purpose of this document is to provide one-stop instructions of how to install and configure a instance of MongoDB and a instance of Vault on the same VM with the simplest single host deployment. This can be served as the pre-requisites steps before installing CAS Manager. TLS is configured on this host for secure connection with CAS Manager. Once these components have been configured and installed, CAS Manager will need to be installed.
For information on installing CAS Manager, see https://www.teradici.com/web-help/cas_manager/21.07/cam_standalone_installation/prod_environment/
This VM can be used as the minimum viable external data storage for CAS Manager with the limitation that there is no High Availability on the data persistence layer. Manual steps are required in the DR with the data lost to the last healthy backup.

Setting up MongoDB and Vault in a Single Virtual Machine
Steps on Creating Self Signed TLS Certificates
The following outlines the steps to perform to create a self signed Certificate for the target Host that MongoDB and Vault will be installed on.
NOTE: The steps outlined below have only been tested on CentOS. These steps may not work as outlined on other systems.
Requirements
Prior to starting the steps below, make note of the FQDN of your VM. To do this you need to ssh into your VM that you plan to install Mongo and Vault on and enter the following command "hostname -A". This will display the FQDN of the VM that you will need during during the certificate creation.
1. From the Mongo Server, enter the following commands:
openssl genrsa -out rootCA.key 4096
2. Enter the following command. Replace the following with your information:
C= Country, ST=State, O=Organization, CN=Common Name
openssl req -x509 -new -nodes -key rootCA.key -sha256 -days 1024 -out rootCA.crt -subj "/C=CA/ST=BC/O=Team Voltron/CN=Voltron Test CA"
3. Enter the following command with the Vault Server FQDN and the internal and external IP address for the Vault server:
export SAN="subjectAltName=DNS:FQDN-OF-THE-VM,IP:INTERNAL-IP-OF-THE-SERVER,IP:EXTERNAL-IP-OF-THE-SERVER,IP:127.0.0.1"
4. Enter the following command:
openssl genrsa -out mycert.key 2048
5. Enter the following command. Replace the following with your information:
C=Country, ST=State, O=Organization
openssl req -new -sha256 \

 -key mycert.key \

 -subj "/C=CA/ST=BC/O=Team Voltron/CN=localhost" \

 -reqexts SAN \

 -config <(cat /etc/pki/tls/openssl.cnf <(printf "\n[SAN]\n${SAN}")) \

 -out mycert.csr
6. Enter the following command:
openssl x509 -req -in mycert.csr -CA rootCA.crt -CAkey rootCA.key -CAcreateserial -out mycert.crt -days 500 -sha256 -extfile <(printf "${SAN}")
7. Enter the following command. You can specify a different name for the crt file if you prefer:
cat mycert.crt >> myserver.pem
8. Enter the following command, you can specify a different name for the key file if you prefer:
cat mycert.key >> myserver.pem
9. Enter the following command to check your certificate:
openssl verify -CAfile rootCA.crt mycert.crt
Installing Vault with TLS enabled
The steps below outline how to install an external Vault instance for use with CAS Manager. This document is based on using Vault with raft and CAS Manager deployed in CentOS/RHEL.
Reference Material
For more information, please refer to https://learn.hashicorp.com/tutorials/vault/getting-started-deploy?in=vault/getting-started
For this document we use vi as the text editor, but any editor of your choice can be used to edit the configuration files.
1. Enter the following command to install vault:
sudo yum install -y yum-utils
2. Add the official HashiCorp Linux repo by entering the following command:
sudo yum-config-manager --add-repo https://rpm.releases.hashicorp.com/RHEL/hashicorp.repo
3. Install Vault by entering the following command:
sudo yum -y install vault-1.7.1-1.x86_64
4. Check that Vault was installed successfully by running the following command in a new terminal session:
vault
5. Copy your pem file to the /opt/vault/tls folder:
sudo cp NAME-OF-YOUR-PEM-CERT-FILE /opt/vault/tls/NAME-OF-YOUR-FILE
6. Rename the original config.hcl file:
sudo mv /etc/vault.d/vault.hcl /etc/vault.d/vault.hcl.old
7. Configure the vault config file by entering the following command:
sudo vi /etc/vault.d/vault.hcl
8. Modify the vault config file to enable TLS, and specify the path to the TLS cert file and the TLS key file, as outlined in the example below. The tls_cert_file and tls_key_file parameters should point to the path and filename of your certificate file and key file:
# Full configuration options can be found at  https://www.vaultproject.io/docs/configuration

ui = true

storage "raft" {
  path = "/opt/vault/data"
  node = "node1"
}

#HTTP listener
listener "tcp" {
  address       = "0.0.0.0:8200"
  tls_cert_file = "<PATH-OF-YOUR-CERT FILE. ex /opt/vault/tls/myserver.pem"
  tls_key_file  = "<PATH-OF-YOUR-CERT KEY. ex /opt/vault/tls/myserver.pem"
}

api_addr = "https://127.0.0.01:8200"
cluster_addr = "https://127.0.0.1:8201"
9. Enter the following command to create the vault.service file. This command will enable Vault to run as a system service:
sudo vi /etc/systemd/system/vault.service
10. Add the following confirmation to the file:
#Contents of vault.service
[Unit]
Description= "HashiCorp Vault - A tool for managing secrets"
Documentation=https: //www.vaultproject.io/docs/
Requires=network-online.target
After=network-online.target
ConditionFileNotEmpty=/etc/vault.d/vault.hcl
StartLimitIntervalSec=60
StartLimitBurst=3

[Service]
User=vault
Group=vault
ProtectSystem=full
ProtectHome=read-only
PrivateTmp=yes
PrivateDevices=yes
SecureBits=keep-caps
AmbientCapabilities=CAP_IPC_LOCK
Capabilities=CAP_IPC_LOCK+ep
CapabilityBoundingSet=CAP_SYSLOG CAP_IPC_LOCK
NoNewPrivileges=yes
ExecStart=/usr/bin/vault server -config=/etc/vault.d/vault.hcl
ExecReload=/bin/kill -- signal   HUP $MAINPID
KillMode=process
KillSignal=SIGINT
Restart=on-failure
RestartSec=5
TimeoutStopSec=30
StartLimitInterval=60
StartLimitIntervalSec=60
StartLimitBurst=3
LimitNOFILE=65536
LimitMEMLOCK=infinity

[Install]
WantedBy=multi-user.target
11. Enter the following commands to enable and start Vault using the systemctl command. These commands are responsible for controlling the systemd managed services. Once these commands have been run, Vault will be restarted but it will still be sealed. You must then unseal the Vault:
sudo systemctl enable vault
sudo systemctl start vault
sudo systemctl status vault
12. Open a new terminal session and enter the following commands with your Vault server information to initialize Vault:
export VAULT_ADDR='https://IP-OF-VAULT-SERVER:8200'
export VAULT_CACERT='PATH-TO-CERTIFICATE'
13. Initialize Vault by entering the following command. When run, this command will display a list of unseal keys and the root token. Save this information as you will need it later:
vault operator init
14. Unseal the Vault. You will need to enter the following command three times, each time you need to specify a different key from the list you generated in step 13:
vault operator unseal
15. Enter a key and press Enter. Each time you need to specify a different key. Once you have entered the command three times, you will be prompted to authenticate by providing the root token. Enter the following command:
vault login <ROOT-TOKEN - Enter the root token that was displayed in previous step>
16. Enter the following command to enable the secrets path that is expected:
vault secrets enable -path=secret/ kv
The secret path should be successfully accepted and Vault should be configured and ready to be used by CAS Manager.
17. Create a Vault policy call "casm" by entering the following:
vault policy write casm-policy - << EOF
path "secret/data/*" {
capabilities = ["create", "update", "read", "delete", "list"]
}
EOF
18. Create a role for CASM by entering the following command:
vault write auth/token/roles/casm-role allowed_policies="casm-policy" period="768h"
19. Create a token to be used by CASM by entering the following command:
Vault token create -role=casm-role -orphan
Ensure you save this token as it will be used in the CAS Manager setup.
If you restart Vault then it will be sealed and you must go through the process of unsealing Vault. Run the following command to unseal Vault:
$ export VAULT_SKIP_VERIFY=True
$ vault operator unseal
You will need to enter the Unseal Key and then repeat the "vault operator unseal" command two more times. You must specify a different unseal key each time.
Installing MongoDB with TLS enabled
The following section outlines the steps involved to configure MongoDB Server.
Reference Material
MongoDB Reference page https://phoenixnap.com/kb/install-mongodb-on-centos-8#htoc-step-1-add-mongodb-software-repository
MongoDB Logs:
- The MongoDB logs can be found under /var/log/mongodb/mongo.log
- The log is a helpful tool in debugging when something isn't behaving as expected
NOTE: If you make any changes to the /etc/mongod.conf file, then you must restart mongodb for the changes to take effect ('sudo systemctl restart mongod')
If the username or password contain any of the following special characters : / ? # [ ] @ % then those characters must be converted using percentage encoding in the mongodb connection string. In other words, the CAS Manager VM must use percentage encoding for the special characters when defining the mongodb-connection-string. For example, if you defined user 'camadmin' with password 'Password%' in mongodb. Then in CAS Manager, the db-connection-string for mongodb would look like this "mongodb://casmuser:Password%25@ip_of_mongodb:27017/name_of_mongodb"
1. On the VM that you plan to install MongoDB on, enter the following command:
sudo vi /etc/yum.repos.d/mongodb-org-4.2.repo
2. Add the following content to the file:
[mongodb-org-4.2]

name=MongoDB Repository

baseurl=https://repo.mongodb.org/yum/redhat/$releasever/mongodb-org/4.2/x86_64/

gpgcheck=1

enabled=1

gpgkey=https://www.mongodb.org/static/pgp/server-4.2.asc
3. Install MongDB with the following command:
sudo yum install -y mongodb-org
4. If the .pem file is not in /etc folder, you can run the following command to move the file to /etc folder:
sudo mv PATH-OF-CERT-PEM-FILE /etc/NAME-OF-CERT-PEM-FILE
5. Modify the file permissions of the mongo-certificate.pem file by entering the following command:
sudo chmod 755 /etc/<NAME-OF-MONGO-CERTIFICATE-PEM-FILE>
6. Rename the current mongodb config file:
sudo mv /etc/mongod.conf /etc/mongod.conf.orig
7. Create a new Mongodb config file by entering the following command:
sudo vi /etc/mongod.conf
8. Enter the following information. Ensure that you replace the 'certificateKeyFile' field to the path of your mongo-server.pem file:
# mongod.conf

# for documentation of all options, see:
#   http://docs.mongodb.org/manual/reference/configuration-options/

# where to write logging data.
systemLog:
  destination: file
  logAppend: true
  path: /var/log/mongodb/mongod.log

# Where and how to store data.
storage:
  dbPath: /var/lib/mongo
  journal:
    enabled: true
#  engine:
#  wiredTiger:

# how the process runs
processManagement:
  fork: true  # fork and run in background
  pidFilePath: /var/run/mongodb/mongod.pid  # location of pidfile
  timeZoneInfo: /usr/share/zoneinfo

# network interfaces

net:
  port: 27017
  bindIp: 0.0.0.0  # Enter 0.0.0.0,:: to bind to all IPv4 and IPv6 addresses or, alternatively, use the net.bindIpAll setting.
  tls:
    # mode allowTLS allows connections to be either TLS or non-TLS, but requireTLS means all connetions must be TLS
    mode: requireTLS    # All connections MUST be TLS
    certificateKeyFile: /etc/mongo-server.pem
9. Enter the following commands and ensure that you specify the name of your server.pem file in the second command:
sudo systemctl daemon-reload
sudo chcon system_u:object_r:mongod_var_lib_t:s0 /etc/NAME-OF-SERVER.PEM FILE
sudo systemctl start mongod
10. Confirm the status of mongodb by entering the following command. You should see a status "Active" returned:
sudo systemctl status mongod
11. Open a mongo bash session by entering the following command:
mongo --tls --tlsAllowInvalidCertificates
12. Enter the steps below to create a user to use with CAS Manager (casm). Ensure you modify the following parameters with the correct information:
- user: Username you want to use
- password: Password you want to assign to the user
- clientSource should list the internal IP address of the CAS-Manager Host VM
- serverAddress should list the intenral ip of your MongoDB Server
use casm

db.createUser(
{
user: "casmuser",
pwd: "password"
roles: [ {db: "casm", role:"readWrite"} ], // user only needs readWrite Access to cam DB,
authenticationRestrictions: [
{
clientSource: [
"10.0.0.2", // IP address of the CAM Host
],
serverAddress: ["10.0.0.3"] // IP for the MongoDB server
}
],
}
)
Up to this point you have installed and configured the VM with MongoDB and Vault, and it's ready for the CAS Manager server to connect to
Install CAS Manager on a separated VM
Follow the instruction here https://www.teradici.com/web-help/review/cas_manager/21.07/cam_standalone_installation/prod_environment/#installing-cas-manager to install CAS Manager on a separated VM. You must ensure this VM meets the system requirements
Configuring CAS Manager to connect to the external MongoDB and Vault
Configuring CAS-Manager to use External Vault with TLS
This section outlines the steps that need to be performed to configure CAS Manager to use the external vault.
Requirements:
Prior to starting the steps below, you must ensure you have CAS Manager installed, but have not yet logged into CAS Manager. For information on installing CAS Manager, see http://www.teradici.com/web-help/review/cas_manager/21.07/cam_standalone_installation/prod_environment/#installing-cas-manager. The root.ca file that was created when creating TLS certificates for the host hosting MongoDB and Vault, should be copied over to the CAS Manager VM. You need to access your CAS-Manager VM through ssh to perform the steps below.
1. Enter the following command to generate the templates:
sudo /usr/local/bin/cas-manager generate --all-templates
A config-templates folder will be created in the current directory. Inside the config-templates directory will be a list of all the templates CAS Manager uses.
2. Edit the vault-template.json template file that was created under config-templates folder, and enter the vault server configuration information:
sudo vi PATH-OF-YOUR-TEMPLATE FILE
3. Modify the file with the following information and then save the file:
{
"vault-type": "vault",
"vault-url": "https://IP-ADDRESS-OF-VAULT-SERVER   https or http if using ssl or not>:<port number>",
"vault-secret-path": "secret/data",
"vault-token": "<VAULT-TOKEN>",
"vault-ca-cert-file": "<PATH-TO-YOUR-VAULT-CERTIFICATE-FILE  ex "/home/usr/vault-rootCA.crt>",
"vault-skip-verify-cert": <true or false>

 "vault-enable-token-renew": false,
 "vault-token-renew-interval": "@hourly"
}
4. Enter the following command to upgrade CAS Manager to use your external Vault server. If successful, a message will be displayed indicating that CASM is ready for use:
sudo /usr/local/bin/cas-manager update --config-file PATH-OF-VAULT-JSON-TEMPLATE-FILE
5. Enter the following command to verify the Vault connection:
sudo /usr/local/bin/cas-manager diagnose --health
NOTE: If you turn the Vault Server VM off, then you must unseal the Vault, otherwise you will not be able to connect to CAS Manager.
Configuring CAS Manager to use External MongoDB with TLS
This section outlines the steps that should be performed to configure CAS Manager to use external MongoDB.
Requirements:
Prior to starting the steps below, you must ensure you have CAS Manager installed but have not yet logged into CAS Manager. The root.CA file that was created when creating TLS certificates for the host hosting MongoDB and Vault, should be copied over to the CAS Manager VM. You have ssh'd into your CAS Manager VM to perform the steps below.
1. Enter the following command to generate the templates:
sudo /usr/local/bin/cas-manager generate --all-templates
2. Edit the mongo-template.json template that was created under the config-templates folder and enter the mongo server configuration information:
sudo vi PATH-OF-YOUR-TEMPLATE FILE
3. Modify the file with the following information, and then save the file:
{
"db-connection-string": "mongodb://USERNAME:PASSWORD@IP_OF_MONGODB:27017",
"db-enable-tls": <TRUE or FALSE>,
"db-skip-verify-cert": <TRUE or FALSE>
"db-ca-cert-file": "<PATH-TO-YOUR-MONGO-CERTIFICATE-FILE ex "/home/casm/mongo-rootCA.crt>"
}
4. Enter the following command to update CAS Manager to use your external Mongo Server. CAS Manager will be updated to use Mongodb with certificates:
sudo /usr/local/bin/cas-manager update --config-file PATH-OF-MONGO-JSON-TEMPLATE-FILE
5. Enter the following command to verify the connection:
sudo /usr/local/bin/cas-manager diagnose --health
Backup and Restore Considerations
Instead of backing up and restore data in MongoDB and Vault separately, in order to maintain the data integrity between mongoDB and Vault, we recommend cloning the VM. In the future we will provide tools to backup and restore the data in MongoDB and Vault in one go.
The following section outlines the steps involved to clone a VM with one of the supported service providers. Please note that if you are using certificates you will need to resolve DNS or re-create the certificates.
The following steps will create a snapshot of the VM:
- Go to the Create a Snapshot page in the Google Cloud Console.
- Enter a snapshot Name.
- Optionally, enter a Description of the snapshot.
- Under Source disk, select an existing disk from which you want to create a snapshot.
- Click Create to create the snapshot.
The following steps will create a Disk so that you can attach the snapshot:
- Go to the Disks page
- Click on Create Disk.
- Specify a Name for the disk.
- Select the Location Region and Zone that you want to assign.
- Under Disk source type, select Snapshot.
- From Source snapshot drop down menu, select the snapshot.
- Specify a Disk type.
- Click Create to create a snapshot.
The following steps will restore the snapshot:
- In the Google Cloud Console, go to the Snapshots page.
- Find the name of the snapshot that you want to restore.
- Select the VM you want to restore the snapshot on and then select Edit.
- Click Attach existing disk.
- From the Disk drop-down menu, select the name of the snapshot to restore and then click Done.
- Click Save to save the changes to the VM.
Cloning VM in AWS
This section outlines the steps that need to be performed to backup and restore a Vault/Mongo VM in AWS.
The following steps will create an image of the VM:
- Log in to the AWS Management Console.
- Select your instance and then select Create Image from the Image menu.
- Specify an Image name and then click on Create Image.
The following steps will launch a new instance with the image:
- Open the EC2 console
- From the navigation bar, select AMIs
- Select the AMI and then select Launch
- Choose an instance type, and then choose Next: Configure Instance Details .
- Select Next: Add Storage.
- Select Next: Add Tags.
- Select Next: Configure Security Group. You can associate a security group with your instance to allow or block traffic to the instance.
- Select Review and Launch. Review the instance details.
Cloning VM in Azure
This section outlines the steps that need to be performed to backup and restore a Vault/Mongo VM in Azure.
The following steps will create a snapshot of the VM:
- On the Azure portal, select Create a resource.
- Search for and select Snapshot.
- In the Snapshot window, select Create. The Create snapshot window appears.
- Enter a Name for the snapshot.
- Select an existing Resource group or enter the name of a new one.
- Select an Azure data centre Location.
- For Source disk, select the managed disk to snapshot.
- Select the Account type to use to store the snapshot. Select Standard_HDD, unless you need the snapshot to be stored on a high-performing disk.
- Select Create.
The following steps will create a Disk so that you can attach the snapshot:
- Go to the Disks page
- Click on Create Disk.
- Specify Resource Group for the disk
- Select the Location Region and Zone that you want to assign
- Under Source Type, select snapshot.
- From Source snapshot drop down menu, select the snapshot you want.
- Click Create to create the snapshot.
The following steps will restore the snapshot:
- In the Azure Console, go to the Disks page.
- Find the name of the snapshot that you want to restore.
- Select the VM you want to restore the snapshot on, and then select Create VM.
- Click Attach existing disk.
- From the Disk drop-down menu, select the name of the snapshot to restore and then click Done.
- Click Save to save the changes to the VM.