HP Anyware-Okta MFA Integration in GCP
Overview
This document describes the steps to integrate Okta MFA with an existing HP Anyware deployment on Google Cloud Platform (GCP). The process involves installing an Okta Active Directory (AD) agent and an Okta RADIUS agent in a Windows virtual machine (VM) in the HP Anyware deployment and configuring the Okta service from the Okta Administrator Dashboard. At the end of the process, a HP Anyware user will need to authenticate using both their AD credentials as well as a code from their Google Authenticator app before starting a PCoIP session.
This article contains the following sections:
- Prerequisites
- Creating an Okta Agent Host (Optional)
- Configure Okta
- Install the Okta AD agent
- Import AD Users
- Install the Okta RADIUS agent
- Open Port in Windows Firewall
- Configure Okta RADIUS Application
- Update the HP Anyware Connector
- User Registers MFA
Prerequisites
For more details of the architecture, please refer to HP Anyware Manager as a Service Documentation, or create a HP Anyware deployment using Terraform.
- A working HP Anyware deployment on GCP managed by HP Anyware Connectors. There should be:
-
A domain controller running AD
-
One or more HP Anyware Connectors
-
One or more remote workstations
-
- An Okta Workforce Identity account.
The steps described in this document assumes a new Okta account. For organization accounts with an existing Okta account and existing configurations, adjust the steps accordingly.
Creating an Okta Agent Host (Optional)
The Okta AD Agent and the Okta RADIUS agent need to be installed in a Windows VM. For a simple proof-of-concept deployment or to save on compute costs, these agents can be installed together and directly in the Domain Controller. Alternatively, a separate Windows VM can be dedicated to running these agents. This guide will assume the latter option.
Create a Windows Server 2016 Datacenter VM and ensure that it has network connectivity with the domain controller and the HP Anyware Connector.
Note: This does NOT work on Server 2019, see https://social.technet.microsoft.com/Forums/en-US/cf047df5-ed4a-46b9-9564-c9db5a9bc8dc/windows-server-2019-default-nps-firewall-rules-port-1812-udp-not-working?forum=ws2019
- Ensure UDP port 1812 is open internally in the firewall settings as this VM will act as the RADIUS server.
- Ensure TCP port 3389 is open to the appropriate IP addresses in the firewall settings to allow configuration of the VM via RDP
This VM will also need access to the internet, and should have a public IP address for initial configuration.
In the GCP console, create a VM with the following properties:
- Name: Name of this VM
- Region: Recommendation is to select a region where the domain controller is located
- Machine type: At least n1-standard-2
- Boot disk: Windows Server 2016 Datacenter
- Disk size: At least 50 GB
- Networking: Select the network and subnet which provides connectivity to the Domain Controller and HP Anyware Connectors
- External IP: Required for initial configuration
After the VM has been created, click on Set Windows Password on the GCP console to set a password for this VM. Then click on RDP to access the desktop of this VM.
The Okta agents requires that the host VM be joined to the domain being managed. To join the domain:
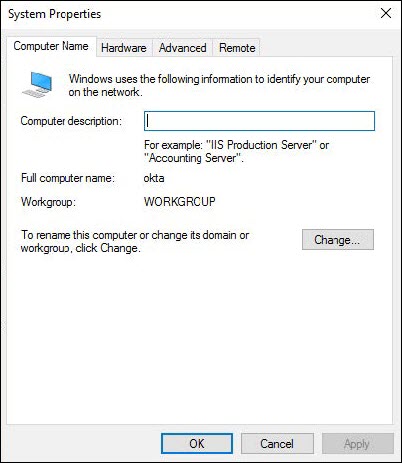
- Navigate to Control Panel > System and Security > System and click on Change Settings under Computer name, domain and workgroup settings.

- From the Computer Name tab, click the Change button.
3. Select Domain in the Member of section and enter your domain name and click OK.
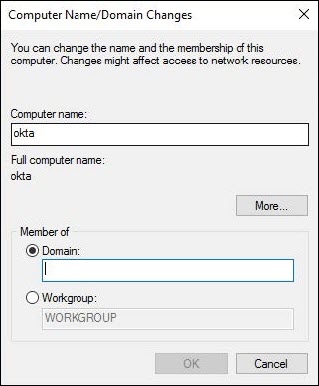
4. On the next screen, enter the user credentials of an AD user with permission to add Computers to the domain.
5. Restart the VM.
Configure Okta
-
From any computer, log into the Okta Administrator Dashboard at https://<your-domain>-admin.okta.com/admin/getting-started with a super admin account.
-
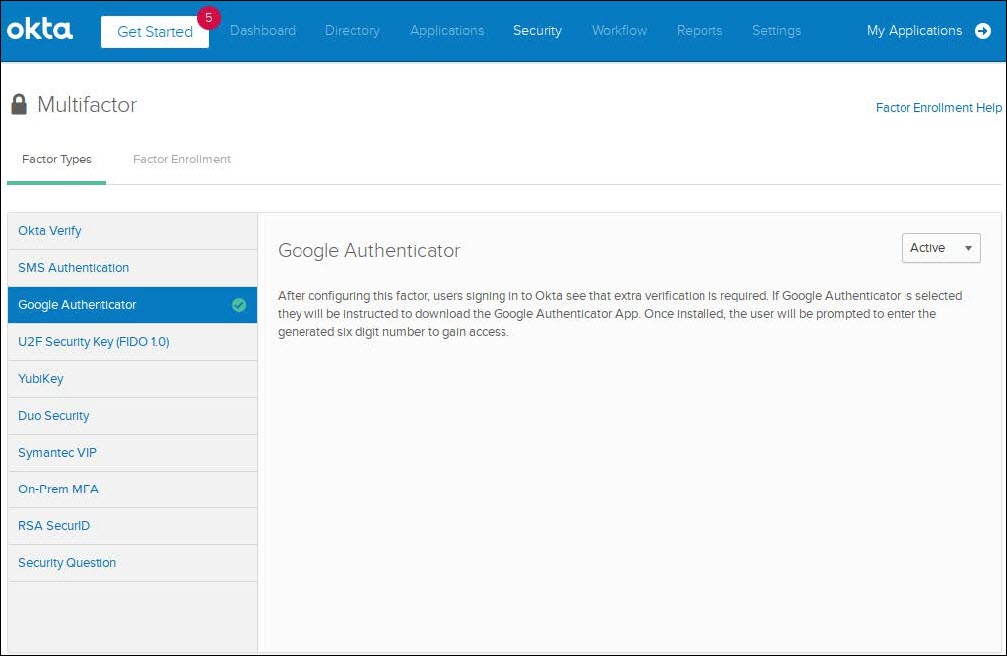
Navigate to Security > Multifactor > Factor Types > Google Authenticator and change Inactive to Active.

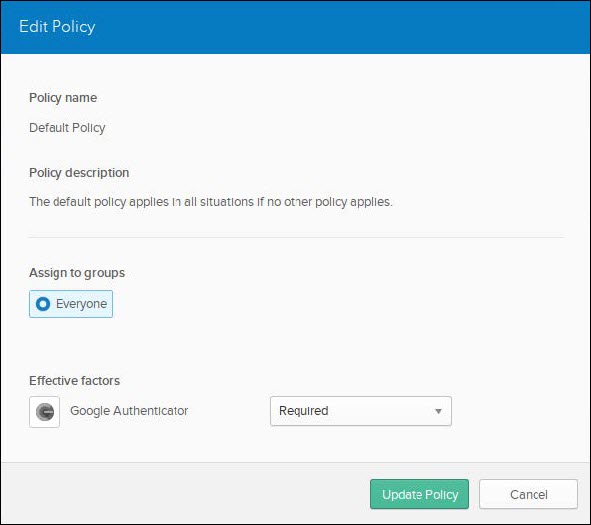
- (Optional) Navigate to Security > Multifactor > Factor Enrollment and click on Edit and change Google Authenticator to Required.

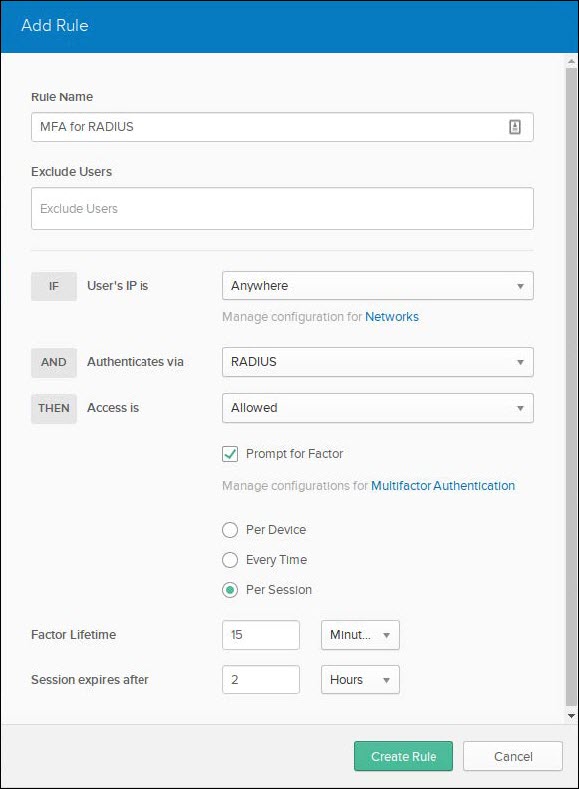
- Navigate to Security > Authentication > Sign On and in the Default Policy (which is assigned to Everyone by default) click on Add Rule.

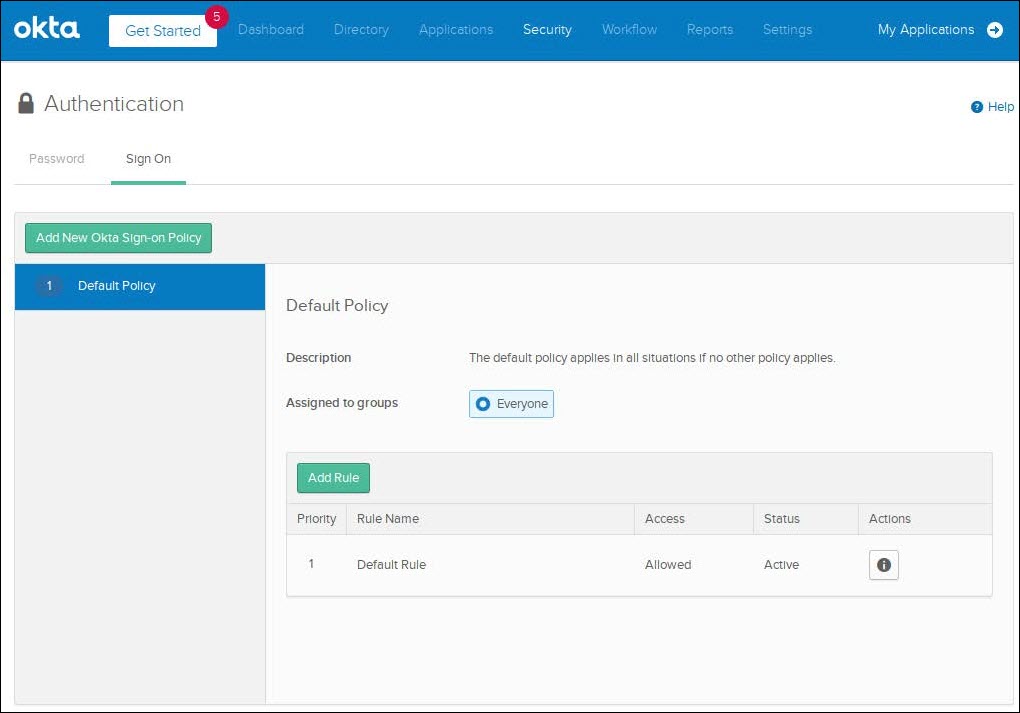
-
Ensure the configuration includes the following options before clicking the Create Rule button.

- Rule Name: Give the rule a name.
- Authenticates via: RADIUS
- Prompt for Factor: checked
- Access is: Allowed
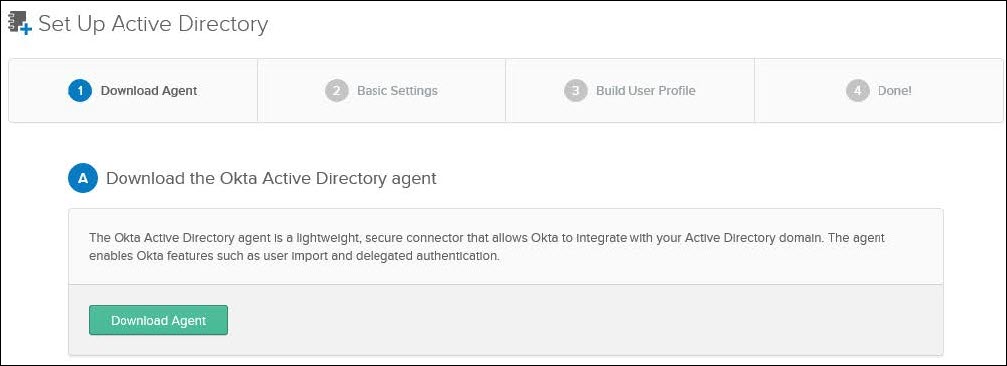
Install the Okta AD agent
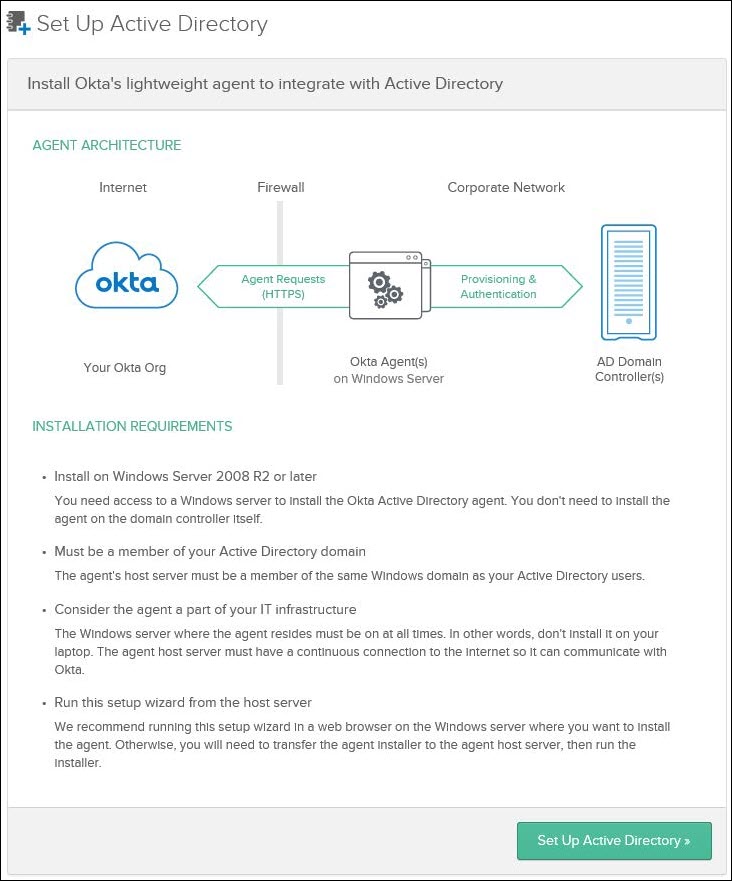
To install the Okta AD agent, RDP into the Windows VM where the agent is to be installed, download the agent from Okta’s Administrator Dashboard and run the installer. For detailed instructions, refer to https://help.okta.com/en-us/Content/Topics/Directory/ad-agent-new-integration.htm
-
RDP into the Windows VM where the Okta AD agent will be installed.
-
Using a web browser, log into the Okta Administrator Dashboard at https://<your-domain>-admin.okta.com/admin/getting-started with a super admin account.
-
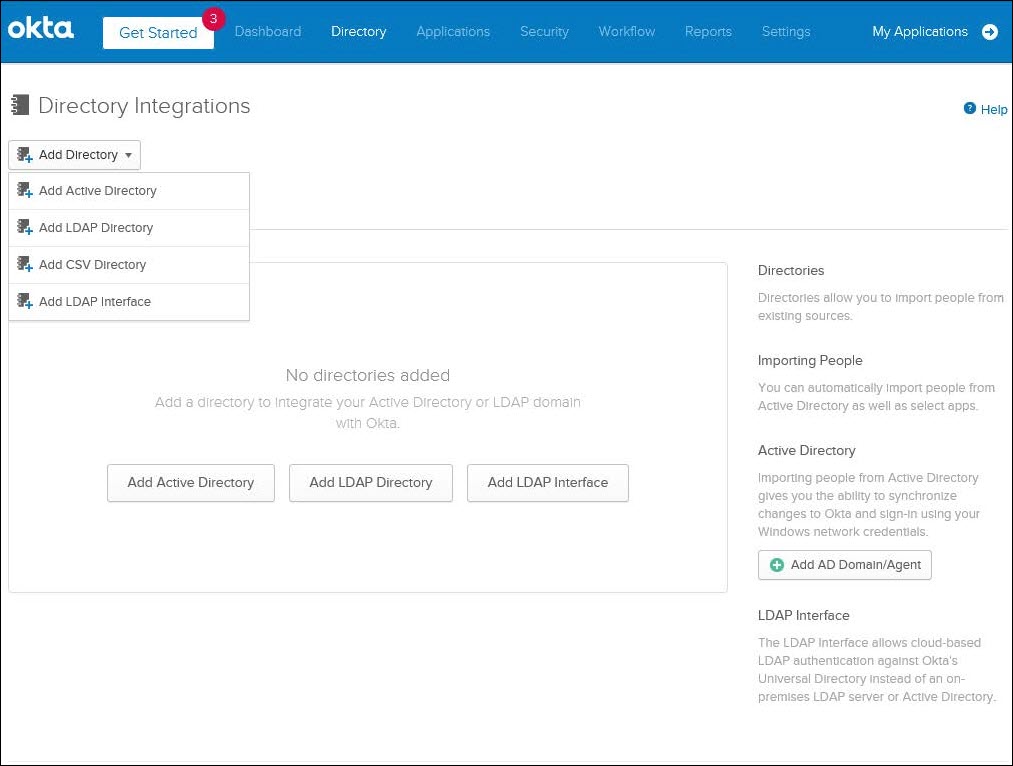
Navigate to Directory > Directory Integrations and perform the following steps:


4. Run the downloaded file to start installing the Okta AD agent and follow the on-screen instructions
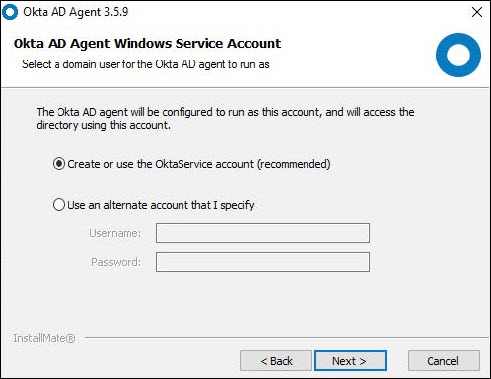
b. Create a new AD account for Okta and click Next.

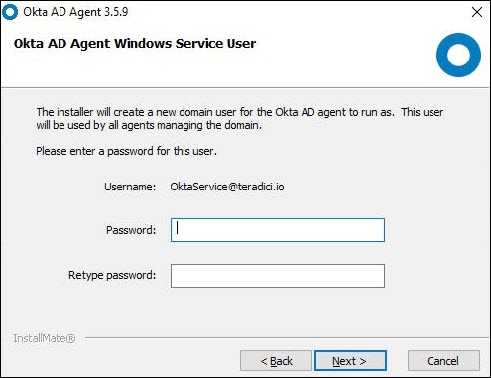
c. Type in a new password for the new AD account and click Next.

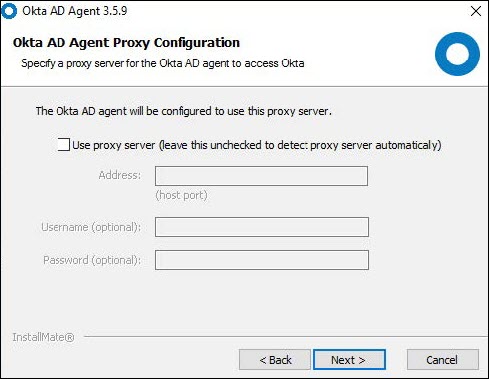
d. Set up the proxy server, if any and click Next.

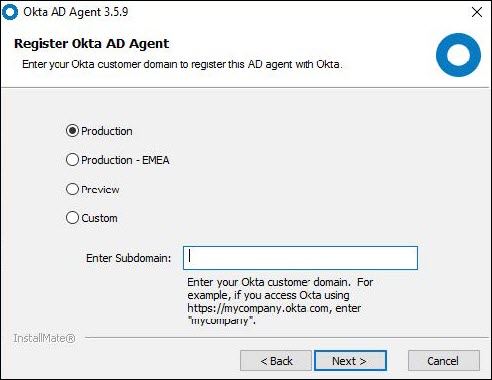
e. Select Production, then enter the sub-domain registered with Okta and click Next.

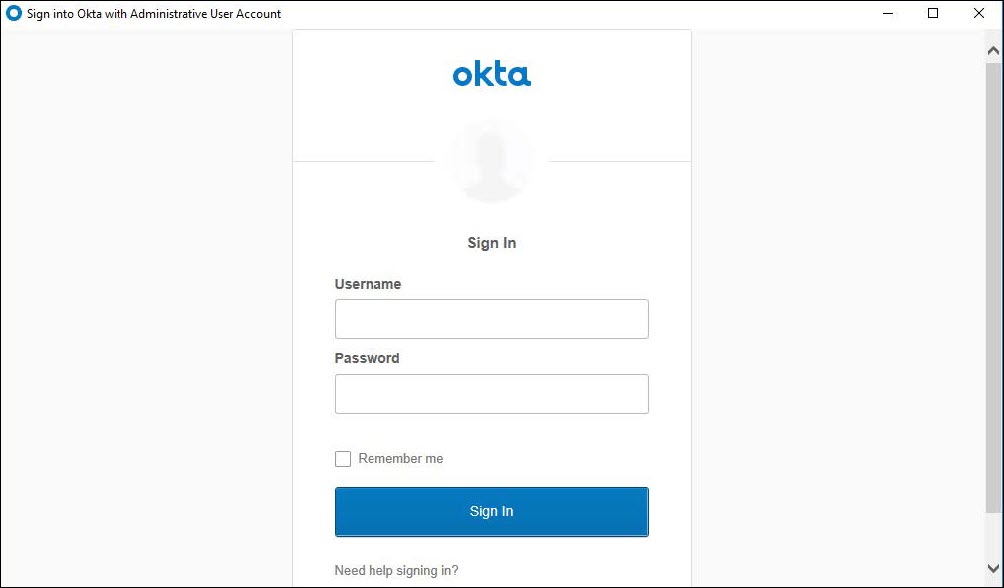
f. The installer will now bring the user to a screen to sign in with the super admin Okta account in order to link this Okta AD Agent with the Okta account. Authenticate with the Okta admin credentials.
NOTE: The resulting popup is forced in Internet Explorer (IE), even if another browser is set to default. Ensure IE Enhanced Security Configuration is set to OFF in the Server Manager, otherwise you'll get a 404 error.

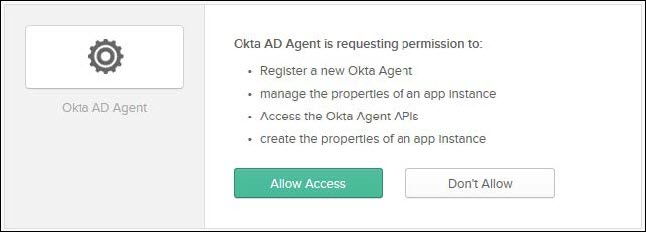
g. After signing in, allow the Okta AD Agent access by clicking Allow Access.

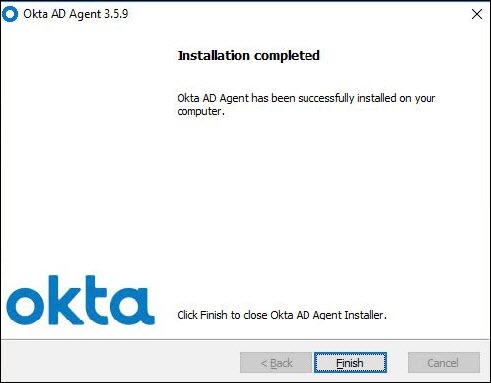
h. Click Finish after the Installation completed message appears.

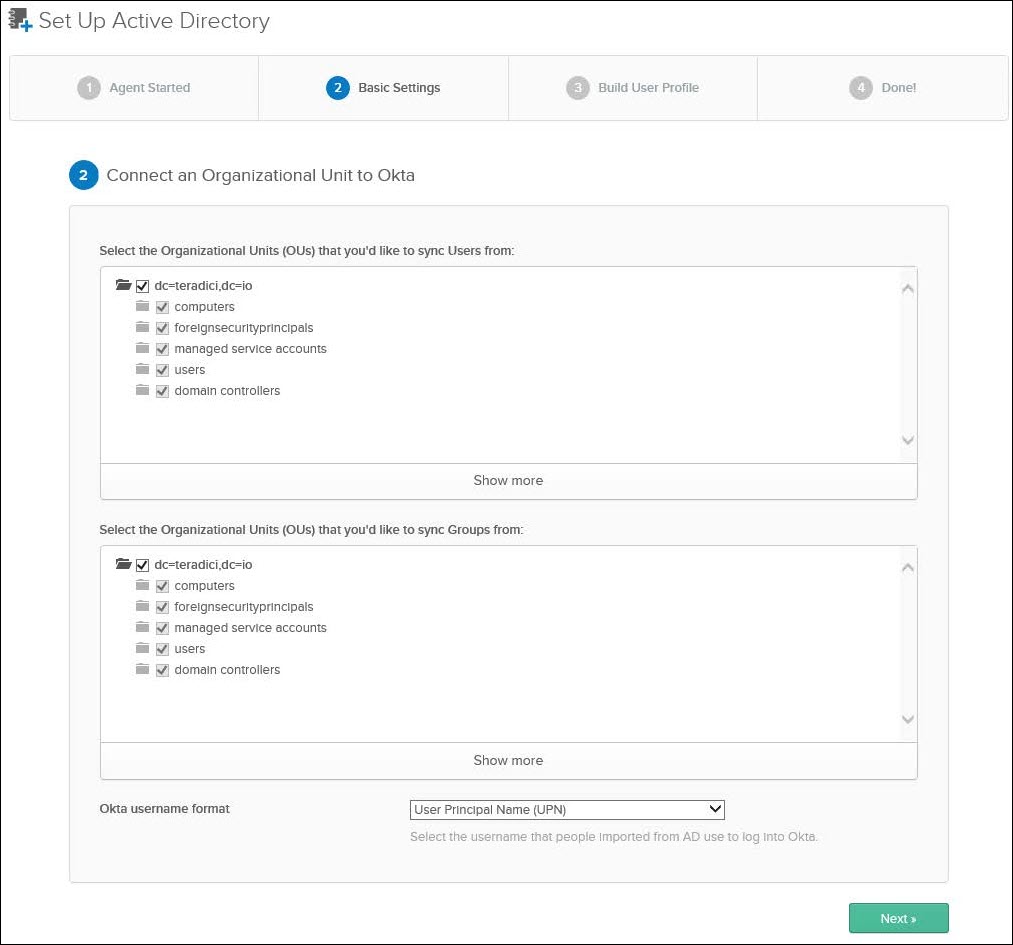
5. After successfully installing the Okta AD Agent, the administrator will be brought back to the Okta Administrator Dashboard in the browser to complete importing AD users to Okta. Select the Organizational Units (OU) from which users and groups are to be sync’ed and click Next.

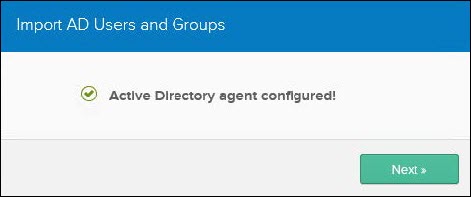
6. Click Next after the Okta Administrator Dashboard confirms the agent has been successfully configured.

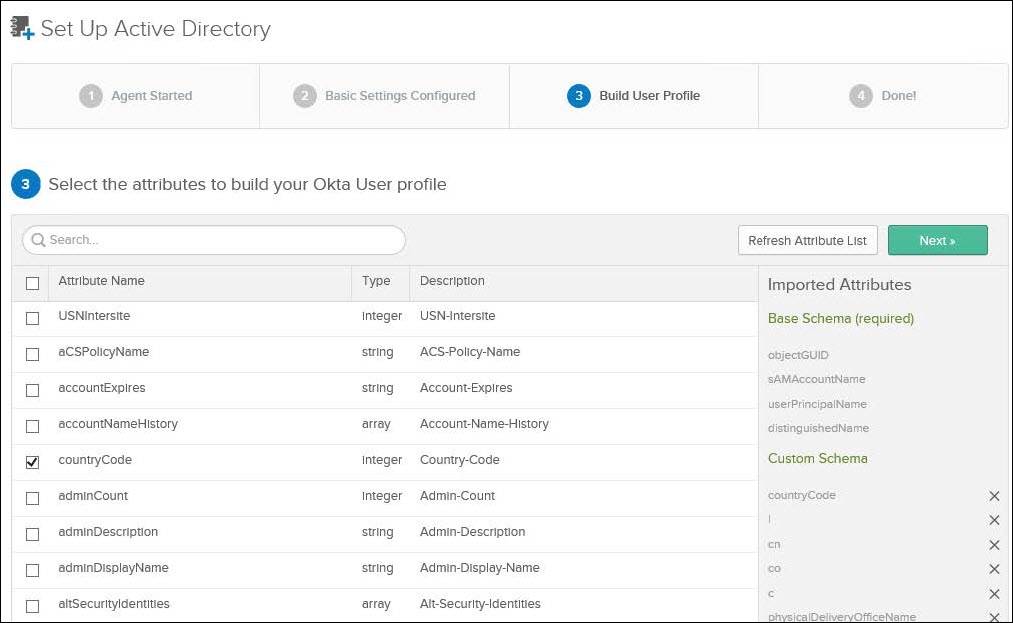
7. Select the required attributes from AD to build the Okta profile and click Next.

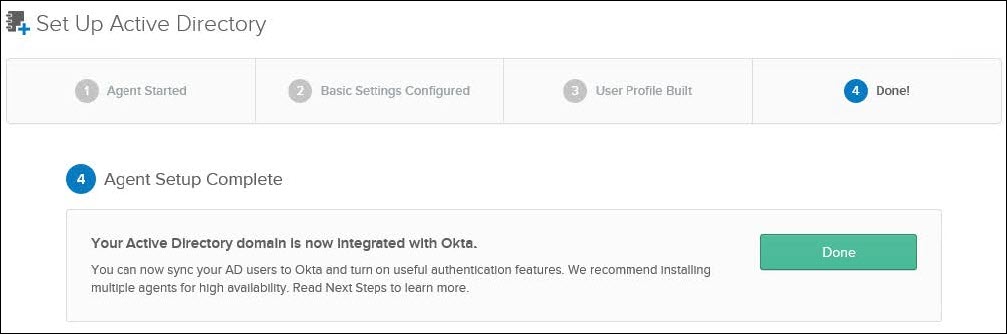
8. Click Done after Okta confirms that AD has been imported successfully.

Import AD Users
-
From any computer, log into the Okta Administrator Dashboard at https://<your-domain>-admin.okta.com/admin/getting-started with a super admin account
-
Navigate to Directory > Directory Integrations and click on the directory that was just set up.
-
Click on the Import tab, then click on Import Now.
-
Select Full import and then click Import.
-
Click OK when Okta displays the number of users and groups imported from the AD.
-
Under the Import tab, there should now be a list of users imported. Select the users for which to set up a new Okta account. Click Confirm Assignments. Note: if an AD user matches or partially matches the Okta super admin account, DO NOT assign the user as it will overwrite the super admin account’s password with the corresponding password on the AD. It is recommended to keep the Okta super admin account and the AD account separate.
-
Click on Auto-activate users after confirmation to skip manual activation of the new users and then click Confirm.
-
New Okta users have now been created for each selected AD user.
Install the Okta RADIUS agent
To install the Okta RADIUS agent, RDP into the Windows VM where the agent is to be installed, download the agent from Okta’s Administrator Dashboard and run the installer. For detailed instructions, refer to https://help.okta.com/en/prod/Content/Topics/Directory/Agent_Installing_the_Okta_Radius_Agent.htm
-
RDP into the Windows VM where the Okta AD agent will be installed.
-
Using a web browser, log into the Okta Administrator Dashboard at https://<your-domain>-admin.okta.com/admin/getting-started with a super admin account
-
Navigate to Settings > Downloads > Okta RADIUS Server Agent and click Download Latest.
-
Run the installer and follow the on-screen instructions shown next.
-
Enter a RADIUS Shared Secret and click Next. This secret is needed when updating the HP Anyware Connector later.
-
Configure your Proxy, if one is in use.
-
Select Production and enter the sub-domain registered with Okta and click Next.
-
Sign in to the Okta account using the Super Admin credentials
-
After signing in, allow the Okta AD Agent access by clicking Allow Access.
-
Click Finish when the Installation completed message appears.
-
Open Port in Windows Firewall
In the Windows VM where the Okta RADIUS agent is installed, a firewall rule must be added to open UDP port 1812.
-
Open the application Windows Firewall with Advanced Security.
-
Click on Inbound Rules on the left panel, then select New Rule from the right panel.
-
Select Port and then click Next.
-
Select UDP and enter 1812 for the specific local port and then click Next.
-
Select Allow the Connection and click Next.
-
Select the appropriate domains and click Next.
-
Give the rule a name and description and click Finish.
Configure Okta RADIUS Application
An Okta Application must be created in the Administrator Dashboard to configure the RADIUS agent. Users using this application must then be assigned to the application. For details, please refer to https://help.okta.com/en/prod/Content/Topics/Security/Okta_Radius_App.htm
- From any computer, log into the Okta Administrator Dashboard at https://<your-domain>-admin.okta.com/admin/getting-started with a super admin account
- Navigate to Applications > Applications and click on Add Application.
- In the search field, search for radius, and select RADIUS Application by clicking the Add button.
- Enter an application label
- Under Sign-On Options, select the following and click Done.
- Okta performs primary authentication: unchecked
- UDP Port: 1812
- Secret Key: The shared secret used previously
- Application username format: AD SAM account name
- Update application username on: Create and update
- Navigate to RADIUS Application > Assignments and click on the Assign drop down button and then select Assign to People.
- Select the users to assign the RADIUS application to. Ensure that the User Name is the AD SAM account name without the domain name (e.g. use user1 for a user with the account user1@example.com)
- The Okta application configuration and user assignment is now complete.
Update the HP Anyware Connector
All existing HP Anyware Connectors in the HP Anyware deployment need to be updated to make use of the Okta RADIUS server. Refer to the HP Anyware Connector documentation for details: https://www.teradici.com/web-help/cas_manager/cloud_access_connector/cac_update/
- SSH into the Anyware Connector.
- Locate the anyware-connector binary (e.g. /root).
- Run the anyware-connector configure command using sudo. The command will prompt for the RADIUS server’s IP and shared secret. Enter the internal IP address of the Windows VM running the Okta RADIUS agent and the previously entered RADIUS shared secret, respectively.
sudo ./anyware-connector configure --enable-mfa
- The update should indicate Connector update complete.
User Registers MFA
Each user must register their MFA device, in this case Google Authenticator, before they can start a PCoIP session.
- As the end-user, visit https://<your-domain>.okta.com.
- Enter the AD username and credentials. Click Create my account.
- Click on the username on the top right of the Okta Dashboard, select Settings.
- Scroll down to Extra Verification and click Setup.
- Follow the instructions to set up Google Authenticator.
Once this step is completed, the user is now set up for MFA with Google Authenticator and may now log in to HP Anyware Connector using MFA.