Client Health Check - Diagnostics and troubleshooting guide
Summary
To receive a detailed client diagnostic report, create a client support/log file bundle and then submit this bundle to the PCoIP health check tool. Once the files are submitted, it will take 5-10 minutes to produce a detailed report. The report will be sent to your registered e-mail address.
Client health check are available for Zero Clients and PCoIP Software Clients (Mac, Windows and Linux).
Client Diagnostics Summary
|
||||||||
|
||||||||
|
||||||||
*Diagnostic defined but not yet implemented.
Details
Client Report Timeline
Shows the time period that the report covers including the session ids and the timezone used. The diagnostic returns:
| Pass: | Logs were found |
| Fail: | Logs were not found. |
Data Collected:
| Session: <X>, <Y>, <Z>. Time are reported in UTC. The local time on the client is: <date> |
Implementation Details:
Category:
This diagnostic is checked at install time.
The diagnostic is the always the first item in the report.
Implementation Steps:
- Step 1: Find all pcoip_client* files. The files in scope are the files associated with the 3 most recent sessions that made it past the Establish Payload phase. See example (a)
- Step 2: Record the session IDs associated with the these sessions. Put the session Ids into the DATA area
- Step 3: Put the local start time in the Data area. See log pattern (d)
- Timeout: Not Applicable.
Time Period:
- The diagnostic start time is the log timestamp in the first line of the first file that is in scope. See example (b)
- The diagnostic end time is the log timestamp in the last line of the last file that is in scope. See example (c)
Example (a) how to find the files that are in scope.

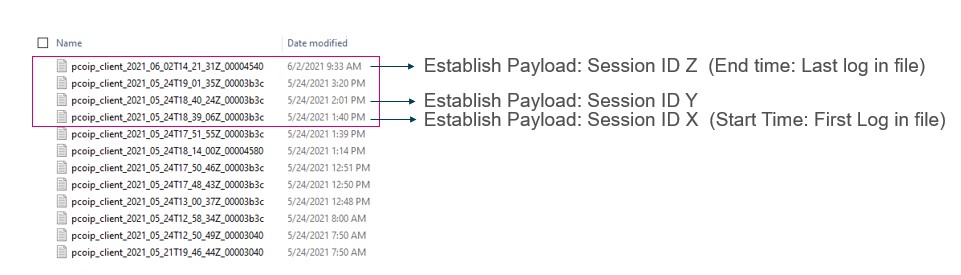
Example (b) find the start time: First line of the oldest file in scope.
2021-05-24T17:51:55.319Z 00000000-0000-0000-0000-000000000000 LVL:0 RC:   0          COMMON :Teradici Module name = Teradici PCoIP Desktop Client TERA_EVENT, Version Number = 21.01.2, Internal product version = release/21.01.2@b09b43b97d
2021-05-24T17:51:55.319Z 00000000-0000-0000-0000-000000000000 LVL:2 RC:   0          COMMON :local time 2021-05-24T12:51:55.319-06:00
Example (c) find the end time: Last line of the newest file in scope.
2021-06-02T14:33:32.593Z ddcb0c80-a5db-1039-9972-000000000000 ....
Example (d) find the local start time: Second line of the oldest file in scope.
2021-05-24T17:51:55.319Z 00000000-0000-0000-0000-000000000000 LVL:0 RC:   0          COMMON :Teradici Module name = Teradici PCoIP Desktop Client TERA_EVENT, Version Number = 21.01.2, Internal product version = release/21.01.2@b09b43b97d
2021-05-24T17:51:55.319Z 00000000-0000-0000-0000-000000000000 LVL:2 RC:   0          COMMON :local time 2021-05-24T12:51:55.319-06:00
Client Type
Shows the type of Agent installed on the host. The diagnostic returns:
| Pass: | Client type reported. |
Data Collected:
| Teradici PCoIP Client | Zero Client |
Implementation Details:
Category:
This diagnostic is checked at install time.
Once the first diagnostic is displayed, subsequent matches should only be displayed if the value changes from the previous displayed value.
Implementation Steps:
- Step 1: Find Client Type. See log pattern (a) or (b)
Time Period:
- The diagnostic starts time is associated with Step 1. The end time is associated with Step 1.
- Timeout: Not Applicable.
Example (a) on how to find the client version for software client (Windows, linux and Mac):
LVL:0 RC: 0 CLIENT :Teradici PCoIP Client:21.03.0_release/21.03.0@1e8a98eda7 is starting up
Example (b) on how to find the client version for zero client :
************************* Device Configuration *************************
Firmware Version: 21.03.1   Firmware Build ID: client-21.03@49603.c2c9d5f488.2427062 ************************************************************************
Client Version
Shows the version of client installed on the host. The diagnostic returns:
| Pass: | Client version is fully supported |
| Warning: | New Client version is available. Recommend upgrading. |
Data Collected:
| 21.03.0 | 20.10.1 - Upgrade to 12.03.0 |
Corrective Actions (if diagnostic does not pass)
|
||||||
Implementation Details:
Category:
This diagnostic is checked at install time.
Once the first diagnostic is displayed, subsequent matches should only be displayed if the value changes from the previous displayed value.
Implementation Steps:
- Step 1: Find Client version. See log pattern (a) or (b)
- Timeout: Not Applicable.
Time Period:
- The diagnostic starts time is associated with Step 1. The end time is associated with Step 1.
Example (a) on how to find the client version for software client (Windows, linux and Mac):
LVL:0 RC: 0 CLIENT :Teradici PCoIP Client:21.03.0_release/21.03.0@1e8a98eda7 is starting up
Example (b) on how to find the client version for zero client :
Operating System
Shows details on the client OS. Diagnostic returns:
| Pass: | OS is compatible with the installed client |
| Warning: | OS may not be compatible with the installed Client |
| Fail: | Memory found on the client is below recommended minimum |
Data Collected:
| Windows 10 Professional (10.0 build 18363) | Darwin 20.3.0 (Apple MacOS) | Linux 5.8.0-48-generic (Generic) 3848MB/8191MB of physical memory available: 8MB |
Corrective Actions (if diagnostic does not pass)
|
||||||||||||
Implementation Details:
Category:
This diagnostic is checked at install time.
Once the first diagnostic is displayed, subsequent matches should only be displayed if the value changes from the previous displayed value.
Implementation Steps:
- Step 1: Find Client OS Type. See log pattern (a) or (b) or (c)
Time Period:
- The diagnostic starts time is associated with Step 1. The end time is associated with Step 1.
Example (a) OS information (Windows)
LVL:2 RC:   0 PRI :===> OS Distribution Name: Windows 10 (10.0 build 22000)
LVL:2 RC:   0 PRI :===> OS Bit System: 32 Bit
LVL:2 RC:   0 PRI :===> Processor Architecture: X86
LVL:2 RC:   0 PRI :===> Processor Bit System: 64 Bit
LVL:2 RC:   0 PRI :===> Number of Processor Cores: 20
Example (b) OS information (MAC)
LVL:2 RC:   0 PRI :===> OS Distribution Name: Darwin 20.6.0 (Apple MacOS)
LVL:2 RC:   0 PRI :===> OS Bit System: 64 Bit
LVL:2 RC:   0 PRI :===> Processor Architecture: X86
LVL:2 RC:   0 PRI :===> Processor Bit System: 64 Bit
LVL:2 RC:   0 PRI :===> Number of Processor Cores: 8
Example (c) OS information (Linux)
LVL:2 RC:   0  PRI :===> OS Distribution Name: Linux 5.6.8+hp (Generic)
LVL:2 RC:   0  PRI :===> OS Bit System: 64 Bit
LVL:2 RC:   0  PRI :===> Processor Architecture: X86
LVL:2 RC:   0  PRI :===> Processor Bit System: 32 Bit
LVL:2 RC:   0  PRI :===> Number of Processor Cores: 4
Memory Check
Shows details on the client OS. Diagnostic returns:
| Pass: | Client has enough memory for basic is compatible with the installed client |
| Warning: | OS may not be compatible with the installed Client |
| Fail: | Memory found on the client is below recommended minimum |
Data Collected:
| Windows 10 Professional (10.0 build 18363) | Darwin 20.3.0 (Apple MacOS) | Linux 5.8.0-48-generic (Generic) 3848MB/8191MB of physical memory available: 8MB |
Corrective Actions (if diagnostic does not pass)
|
||||||||||||
Implementation Details:
Category:
This diagnostic is checked at install time.
Once the first diagnostic is displayed, subsequent matches should only be displayed if the value changes from the previous displayed value.
Implementation Steps:
- Step 1: Find Client Memory available. See log pattern (a) or (b) or (c).
Time Period:
- The diagnostic starts time is associated with Step 1. The end time is associated with Step 1.
Example (a) OS information (Windows)
LVL:2 RC: 0 MGMT_PCOIP_DATA :Memory stat: available physical memory = 2443MB/32460MB
Example (b) OS information (MAC)
LVL:2 RC: 0 MGMT_PCOIP_DATA :Memory stat: available physical memory = 23MB/16384MB
Example (c) OS information (Linux)
LVL:2 RC: 0 MGMT_PCOIP_DATA :Memory stat: available physical memory = 506MB/6929MB
GPU Info
Shows details on the client. Diagnostic returns:
|
Pass: |
GPU Driver Info is available in the client |
Data Collected:
NVIDIA GeForce GTX 650, AMD FirePro V4900 (FireGL V), Intel(R) UHD Graphics 620
Corrective Actions (if diagnostic does not pass)
N/A
Implementation Details:
Category:
This diagnostic is checked at install time.
Once the first diagnostic is displayed, subsequent matches should only be displayed if the value changes from the previous displayed value.
Implementation Steps:
-
Step 1: Find GPU Driver info. See log pattern (a)
Time Period:
-
The diagnostic starts time is associated with Step 1. The end time is associated with Step 1.
Example (a) GPU Driver information (Windows):
Name                           Property
----                           --------
{4d36e968-e325-11ce-bfc1-08002 Class            : Display
be10318}                       ClassDesc        : @c_display.inf,%ClassDesc%;Display adapters
                               IconPath         : {%SystemRoot%\system32\setupapi.dll,-1}
                               LastDeleteDate   : {155, 61, 79, 131...}
                               LowerLogoVersion : 6.0

    Hive: HKEY_LOCAL_MACHINE\SYSTEM\CurrentControlSet\Control\Class\{4d36e968-e325-11ce-bfc1-08002be10318}

Name                           Property
----                           --------
0000                           DriverDesc                        : NVIDIA GeForce GTX 650
                               ProviderName                      : NVIDIA
                               DriverDateData                    : {0, 64, 238, 199...}
                               DriverDate                        : 4-12-2021
                               DriverVersion                     : 27.21.14.6611
Secure Mode
Shows the security mode being used by the client when connection to a session. Diagnostic returns:
| Pass: | Security mode enabled. |
| Warning: | Security mode relaxed |
Data Collected:
| 0 | 1 | 2 |
Corrective Actions (if diagnostic does not pass)
|
||||||
|
||||||
|
||||||
Implementation Details:
Category:
This diagnostic is checked at pre-session time.
Implementation Steps:
- Step 1: Find security mode. See log pattern (a) or (b)
- Timeout: Not Applicable.
Time Period:
- The diagnostic starts time is associated with Step 1. The end time is associated with Step 1.
Example for (a) software clients:
LVL:2 RC: 0 BROKER :security mode: 1
Example for (b) zero client:
LVL:2 RC: 0 TBD
Ultra Enabled
Shows if a PCoIP session was configured to use PCoIP Ultra. Diagnostic returns:
| Pass: | Client is using Ultra CPU mode or Ultra Auto Offload |
| Warning: | Client is not compatible with ULTRA. |
Data Collected:
| mode: 0 (PCoIP) | 1 (Ultra CPU Offload) | 2 (Ultra GPU Offload) | 3 (Ultra Auto Offload) CPU supports AVX2 | CPU does not supports AVX2 |
Corrective Actions (if diagnostic does not pass)
|
||||||
Implementation Details:
Category:
This diagnostic is checked at install time.
Once the first diagnostic is displayed, subsequent matches should only be displayed if the value changes from the previous displayed value.
Implementation Steps:
- Step 1: Find CPU support result. See log pattern (a) or (b)
- Timeout: Not Applicable.
Time Period:
- The diagnostic starts time is associated with Step 1. The end time is associated with Step 1.
Example (a): Software client logs showing AVX2 as supported:
LVL:0 RC: 0 COMMON :cpu_intrinsics_report: CPU supports AVX2
Example (b): Software client logs showing AVX2 as not supported:
LVL:0 RC: 0 COMMON :cpu_intrinsics_report: CPU does not supports AVX2